Most people prefer to build a bath from a log with their own hands, since this material has several advantages:
- environmental friendliness. For a trip to the steam room to bring maximum benefits, you need to have it built from natural and environmentally friendly materials, which is wood,
- special aroma. When heated, the tree exudes a pleasant and healthy aroma, which makes the process of visiting the baths healthy and pleasant,
- saving. The process of manufacturing and preparing materials is quite simple, therefore, its price is low,
- high thermal insulation. The tree retains heat well, which is important for a bath,
- good ventilation. Logs allow steam and air to pass through while keeping the room warm.
- aesthetics. Wooden buildings look neat and comfortable, they fit perfectly into any exterior,
- long service life. Buildings made of wood are characterized by a high level of reliability, subject to the rules you will receive a structure that will serve you for many years.
Log bath: disadvantages
- fire hazard. A tree burns, unlike a brick or aerated concrete, so it must be treated with special means,
- shrinkage. During the six months after construction, finishing work cannot be carried out, unlike aerated concrete baths, which have minimal shrinkage,
- the need for careful care. Wood is susceptible to decay, so it must be treated with agents that protect it from the effects of the environment,
- build complexity. Building a bathhouse with your own hands from a log is quite difficult, so if you do not have sufficient skills, then it is better to entrust the work to professionals.
Pros and cons of logs
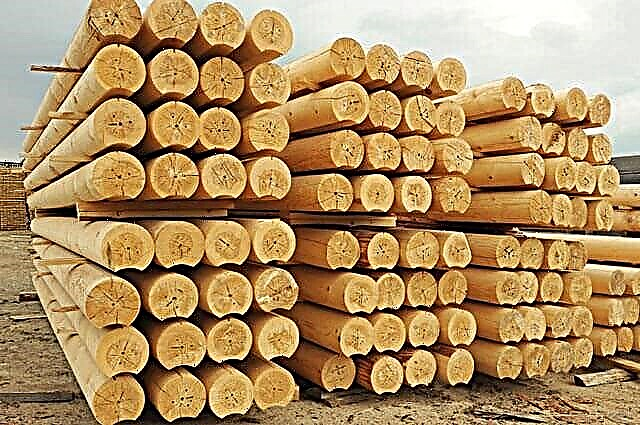
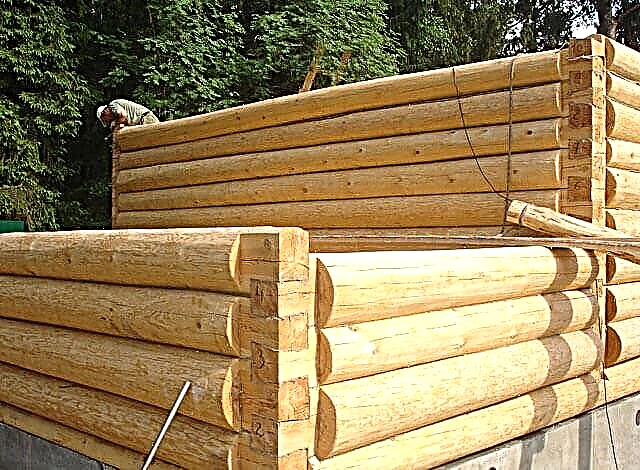
So, what is a fashionable and modern building material? A rounded log is nothing more than a perfectly round wooden beam with a longitudinal butt groove. Such cylindrical logs are made by turning and milling. The result is perfectly round billets. They are also called “pencils”.
The diameter of such "pencils" is different. The take-off run is large: from 160 to 380 mm. A thin beam is used for the construction of baths and houses in warm areas, and a more massive one is used in Siberian and northern conditions. Of course, it is possible to manufacture and to order, but here is a completely different price.
It is best to build a bathhouse from logs from Siberian pine harvested in the northern regions. It has a firmer structure and is resistant to sudden changes in temperature and humidity. High-quality wood when struck by an ax butt has a ringing sound. The ax should easily bounce off the log. The color of the tree should be uniform, light. Blue spots should be absent. If available, the bath will not stand idle for a long time.
Siberian pine is the best raw material for logs. It grows long, even, has few knots and is easy to process.
Pluses of a bath from the rounded log:
- Environmentally friendly and "live" material.
- The walls "breathe" and create a natural microclimate inside.
- Low heat loss: wooden walls retain it perfectly (with proper and high-quality assembly).
- Beautiful aesthetic appearance of the structure.
- Relatively simple and fast installation process.
- No external or internal decoration required.
- The durability of the entire design of the bath (in the presence of high-quality raw materials).
Cons during the construction of the bath from logs:
- It can be difficult to find a good and responsible team of carpenters. After all, installation should be carried out efficiently and professionally. A lot depends on this.
- Cracking of wood occurs. This is due to poor quality raw materials. This issue should also be given special attention.
The choice of the design of the bath from a log
In any case, if you want to build a bathhouse precisely from this material, you will have to contact a specialized company. After all, it is impossible to independently prepare such logs. Companies for the sale of logs usually offer their design and installation services.
It is important to decide what exactly you want to see on your site (dimensions, general view, communications, and so on). You should choose a method of chopping the bath. A bathhouse cut into a bowl looks beautiful, fashionable and practical. Of course, you can choose a more economical option (cutting in the paw), but the structure does not look so aesthetically pleasing, and the corners are not very warm.
Collect a "bath of pencils" in two ways. The first way is to mount the log house in place. That is, a bathhouse is being built right on the customer’s site. All preparatory and installation work is carried out immediately on the spot. In this case, a team of carpenters requires high qualifications.
The second way is the principle of the constructor. The bath is going on the territory of the company. All elements are clearly fitted and labeled. Then the structure is disassembled and transported to the customer’s site. And already here, observing the marking, the final installation of the log house is carried out. Such work requires less qualification from the working staff.
Stage of construction of a bath from logs
As usual - start with the foundation. A ribbon one is best, as the proposed bath will have a decent weight. If the size of the structure is small and allows the soil, then you can do with a screw foundation. It is quite practical and promising.
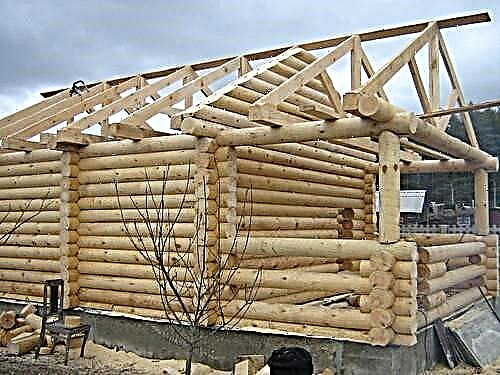
After the foundation is ready, we “raise” the walls and the roof. We install windows and doors. We lay ceilings and floors. We install an electrician, plumbing and install a stove. We are engaged in decoration and furniture.
Despite the fact that in words everything is so easy, fast and simple, a bathhouse made of logs is a complex project. It will be quite difficult to independently implement it. Those who do not have knowledge and practice in carpentry are generally a problem. So, the advice is to find a really good company and entrust it with the construction of your idea. For example, you can contact here.
Features of insulation and wall decoration

After you put the bathhouse under the roof, you should pay attention to the walls. No matter how smooth the beam is and how exactly the installation is not carried out, cracks appear in the logs over time. And so that the joints between them (logs) are the smallest, it is necessary to conduct caulking of the walls. That is, pierce all the seams. The work is long and painstaking, but necessary. It is performed better if you use a wooden or rubber mallet, and in the role of a "chisel" take a piece of a metal plate, slightly sharpening it at the end.
This "thankless" work will help to perfectly insulate the walls. Caulk them immediately from two sides. Seams inside and out are recommended to be closed at the same time. You can’t leave any side “for later”. Otherwise, the structure will skew. Of course, it will not be significant, but still it will be. This option is not entirely good.
What material to apply for these purposes? The best option is a jute insulation. It is simple, practical, they work quickly. You can use moss or linen tow, as our grandfathers did. But, in my opinion, moss is no longer a relevant topic. Better than high-quality jute insulation, you will not find.
Since the tree tends to dry out over time, after about 2 years it will be necessary to re-caulk the walls. Do not be lazy, otherwise the bath will lose its original warmth.
At its core, a bathhouse made of logs practically does not need to be finished. She already looks beautiful, but ... It would be better if the wood is treated with special antiseptics from the outside. For example, Senezh-Aquadecor will not only protect the wood, but also give the bath the color you want.
The interior finish of the bath is completely absent, since it is impossible to paint and varnish here. For a peculiar effect, many in the decoration of corners and joints use a jute rope. Two birds with one stone are killed right away - warming (the same caulking) and wall decoration. It looks very attractive.
In conclusion, I want to note that the bathhouse made of logs is a truly worthy choice. It is modern, beautiful and cozy in Russian. It is possible that some photographs will help you to equip your creation and draw something interesting and unexpected for yourself.
Advantages and disadvantages of a log house
Before starting the construction of a log bath, it is worth considering a number of features of this structure:
- A wooden building quickly picks up and keeps the air temperature at the right level for a long time, that is, it has good thermal insulation.
- The material does not emit harmful substances and is environmentally friendly.
- You can buy wood quite cheaply, although the price, depending on the breed, will be slightly different.
- A log house made of logs is quickly and simply built.
- The natural appearance is pleasing to the eye.
- The tendency to fire due to improper thermal insulation of the furnace.
- Wood requires constant and thorough care.
- Over time, cracks may appear in the logs due to drying out of the wood.
- You can not start finishing and using a fresh log house. It should stand from 0.5 to 1.5 years for the logs to shrink and the bathhouse to take its final shape.
Thus, along with all the undoubted advantages, such a structure will require efforts not only for construction, but also for maintenance. So you should consider this in advance.
Design
As a rule, a bathhouse includes such premises:
- pair office
- dressing room and / or rest room,
- washing or shower room.
At this stage, you need to determine how much space the future bath should occupy. If the total area of the future building does not exceed 20 m 2, then the size of the entire building can be 4 × 3, 4 × 4 or 4 × 5 m. But if you have more space, then the buildings can be made 6 × 4, 6 × 5 or even 6 × 6 m.

Based on the selected area, you can determine the internal dimensions of individual rooms, as well as how many will be. For example, a dressing room can occupy about 1/3 of the entire room of the bath, be combined with a shower, or separate. The rest of the area can accommodate a steam room and other functional areas. It all depends on the preferences of the owners.
Material selection process
At the choice of the owners for the construction of the log house, you can use profiled timber, solid or rounded logs. Inspection and selection of any of the materials should be especially thorough, since the life of the future building depends on this.
Most often, the following wood species are preferred for the construction of a log bath:
- Pine. It is convenient to handle, practically devoid of knots and has a straight trunk. Therefore, it is most convenient for assembling walls.
- Oak. Although it is characterized by durability and high strength, it is quite difficult to operate with it.
- Spruce. Often, floor beams are made from it.
- Larch. This is a very high quality and durable wood. However, not everywhere it can be purchased.
In any of the materials, you need to pay attention to the presence of defects that can reduce the life of the bath:
- The take-off run in the diameter of the logs should not exceed 30 mm.
- The end part of the log on the cut must be dense and uniform. If it is loose, the log inside is rotten.
- It is better not to use over-dried logs, since it is difficult to work with them.
- All branches should be firmly planted in wood and free from gaps.
- The color of the wood should be yellow in color over the entire surface. There should be no blue spots on the slices.
- It is important to evaluate the size and number of cracks in the wood. It is impossible to do without them completely, but the fewer they are, the better.
If temperatures up to -40 ⁰С are recorded in the region in winter, then you need to make a bath of logs with a diameter of 24 cm, and if up to -30 ⁰С, then 18 cm is enough. This is necessary so that the lunar section can reach 2/3 of the total diameter.
The method of processing logs
So, if you want to build a sauna with your own hands from a log and prepare the material yourself, you will need a list of tools, as well as skills in working with wood.
- saw,
- yoke for cleaning wood from bark,
- axes: the first - weighing 1.4 kg with a handle of 60 cm and sharpening under 25⁰, and the second - weighing 0.9 kg with a handle of 50 cm and sharpening under 20⁰,
- plane,
- ax with a circular blade for grooves,
- clamps for logs - it can be either metal staples, or two boards with grooves made in them,
- coated thread
- hell.
All logs should be subjected to further processing no later than two weeks after harvesting and drying (for more details: "How and how to process the log house - rules and methods of processing"). Otherwise, working with them will be much more difficult.

We give detailed instructions on how to assemble a bath from a log with your own hands.
At the first stage, you should adjust all the logs to the desired dimensions, after laying them on the clamps. The connection "in the bowl" implies the presence of an additional 30-60 cm of length in each element. But when fixing "in the paw" the logs are cut exactly according to the design values. If the thickness of the logs on different sides differs by more than 3 cm, then the size must be put aside from the center, adjusting the diameter from each edge separately.
The next step is to remove the knots and bark. First, the work is carried out with an ax, and finishing is finished with a braid, scraping the wood to yellow. The remaining loose top layer is shaved with a plane. Since after this procedure the tree loses its natural defense, it must be treated with an antiseptic.
After that, you can begin to process the logs of the flange. These will be the thickest structural elements. The log is laid so that the winter side, that is, the area with the most dense concentration of annual rings, is facing outward. Next, a diameter line is drawn at the end, and parallel to it, markings are made for cutoff. Similar manipulations are performed on both sides in a log.
Now you can make small cuts and, having laid the coated thread in them, draw a cut-off line along the entire length of the timber. After that, every 30 cm with an ax, serifs are cut down, leaving about 1 cm to the desired depth, and then a layer of wood is gradually removed with a smaller hatchet, moving from one cut to another. The final cleaning is done with a planer.
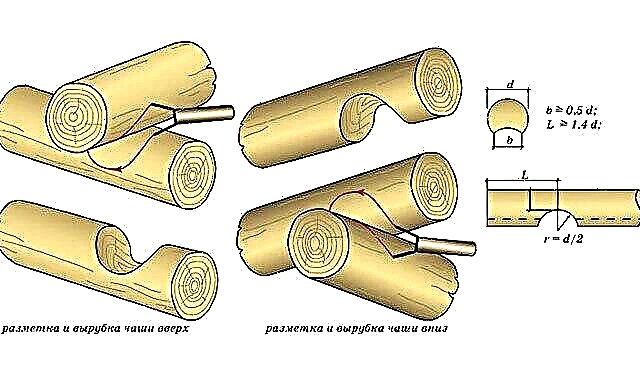
Next, you need to perform a dressing mechanism, as well as a longitudinal groove in the form of a crescent. It is desirable that the lunar groove is in the lower part of the log, then water will not accumulate in the recess.
So, after trying on a log, you should calculate the width of the future groove, which is 2/3 of the average diameter of the neighboring elements. For example, the diameter of the ends is 250 and 235 mm, then the average value will be (250 + 235) ÷ 2 = 242.5 mm. In this case, the groove width is 242.5 × 2/3 = 162 mm. In depth, the channel will be equal to half the average radius. Of course, the obtained values can be slightly rounded.
In this case, the dimensions are taken from the lower beam, and the marks are applied to what is laid on top. For convenience, you can use the dash. Please note that for areas with different climatic conditions there are standards for the width of the lunar groove. So, for the lower value of -40 ⁰С - it is at least 16 cm, for -30 ⁰С - at least 12 cm, and for -20 ⁰С - not more than 10 cm.
The marking for the extraction of wood along the entire length is carried out similarly with a flange. It will be more convenient if you cut a furrow in the center, and then carry out the removal of wood with an ax or saw.You can use tesla. The surface is cleaned with a planer.
To understand how well the logs fit, any dye or charcoal chips are applied to the surface and tried on. After assessing the intensity of staining, we can draw conclusions about the quality of processing and fix blemishes.
Now you need to do the corner connection. For laying "in the bowl" with the help of a line, spread out by ½ of the average diameter of the logs laid in the recess, marking for the bowl is applied. After sawing several vertical recesses, the work is perfected with an ax, a plane or a chainsaw. The result is a semicircular trough.
For lack of features, you can use two pieces of wire 6-8 mm thick, mounted on the handle of the hammer.

But when building a bathhouse from a log with your own hands with the fastening technique “in the paw”, you have to work hard. The first to harvest the boobs, that is, logs with grooves. In this case, the blocks are always placed in one plane, that is, on both sides of the same log.
To determine the width of the doodles take the thinnest log and calculate the value of 2/3 or 3/4 of its diameter. The depth of the boobs will be equal to the average diameter of the thickest log. Moreover, these values will be unchanged for the entire material. It is necessary to postpone the width of the doodles, starting from the center line.
Then you can cut the paws. For this, two log houses are made in the upper and lower parts of the block, the depth of which is equal to the width of the groove. After that, joints are made, dividing it into 8 equal parts. To ensure that all elements are the same, you can use a dash or template.
However, if the process for processing compounds is too complicated for you, you can purchase material with ready-made compounds.
Note that when processing wood, it is better to use an ax, which clogs the fibers in the work areas, and the tree is less affected by fungus and parasites.
Foundation pouring
If you decide to build a bathhouse from logs, you should take care of a reliable foundation that can withstand such a load (more: "Building a bath from logs - step by step guide").
There are several types of foundation:
- Tiled. The most expensive and reliable type of foundation. It is used in northern latitudes with extreme frosts and on unstable soils.
- Tape. The most common type of base. It consists of a reinforcing mesh, poured with a layer of concrete around the entire perimeter of the building.
- Columnar. It is used for small, relatively light buildings. It consists of a number of separate columns supporting the supporting elements of the building.
- Unfinished. It is made in the same way as the strip foundation, but is installed on top of the soil on a special pillow.
- In-depth. Its sole is lowered into the ground a certain distance.
Deciding what the foundation will be on your site, you need based on what type of soil is on your site. In places where gravel or rocky rocks prevail in the soil, a columnar or shallow foundation is suitable. But on sandy, forestry or fertile soils with closely lying groundwater it is better to stay on a strip foundation.

It is worth remembering that if the columnar type of foundation is selected, additional supports must be laid under the furnace.
Consider the most affordable versions of the foundation.
To work, you need the following tools:
- shovel,
- tape measure or cord for marking,
- hook for knitting wire,
- a grinder with a set of discs,
- a concrete mixer or other container for mixing the mortar,
- wheelbarrow for transportation
The required list of materials includes:
- unedged board for formwork,
- pegs made of timber
- fishing line
- strapping wire,
- fittings
- gravel,
- sand,
- cement.
The first step before filling the strip foundation is to clean the construction site from debris and plants, level the surface and remove the top layer of the earth.
Further along the outer perimeter of the building, 4 pegs are driven into the corners by pulling a fishing line between them. Checking the markings can be done by measuring diagonals. From the outer edge, you need to retreat the width of the foundation and another 10 cm and drive 4 more columns. Between them also pull the fishing line, indicating the inner edge.

It is necessary to position the fishing line at the height of the future foundation, taking into account its deepening into the soil by 50-70 cm for large buildings or 40-50 cm - for smaller buildings, as well as the thickness of the backfill of 15 cm and its elevation above the ground.
Now you need to dig a trench for the foundation. Soil can be dumped in the center for adding a socle. The bottom of the trench is covered with sand, watered and rammed.
Shields for formwork are knocked out of the boards, placing them on both sides along the perimeter of the site. The height of the formwork is equal to, or slightly larger than the foundation.
Further, using a knitting wire and reinforcement of 12 mm diameter, a crate is made. 4 rods are taken from each side, connecting them with 40 cm intervals.
The lath is laid in a prepared ditch and is connected by rods in the corners. A distance of 5 cm from each side must remain from the reinforcement to the walls of the formwork so that they are completely hidden in concrete. Sometimes bricks are laid at the bottom.
At the next stage, pipes for ventilation from sewer pipes are installed.

For pouring, you need to prepare a solution of cement, gravel and sand in a ratio of 1: 3: 3. It is advisable to fill as quickly as possible so that the concrete is uniform throughout the plane.
Further, for several weeks, while the concrete will set, it is periodically watered so that drying takes place gradually. At the same time, it can be covered with a film to preserve moisture.
If the soil on the site is stable, then a columnar foundation can be used with your own hands to build a bath from a rounded log. It will require the same tools, and instead of material for formwork - asbestos pipes of 20 cm in diameter.
The sequence of actions looks like this:
- Preparation and marking of the territory.
- Mark the corners of the structure, as well as the location of the supporting structures.
- Control points are applied from corners every 1-1.5 m.
- In the soil, recesses under the columns are selected one level below the freezing of the soil. The width of such a pit should exceed the size of the support by 5-10 cm.
- The bottom of the pit is filled with a sand layer with a height of 15-20 cm, which must be compacted and spilled with water.
- The round hole does not need to be strengthened, and the rectangular hole needs additional formwork in order to avoid sprinkling of soil.
- The pipes are cut in length, taking into account the deepening in the pit and the ledge above the surface by 40 cm.
- Prepare a solution in the ratio indicated above.
- Asbestos pipes are isolated with rolled bitumen or other material and lowered into a pit.
- Fine gravel is poured around the pipe at about ½ height and rammed.
- Cement mortar is poured into the pipe at half height and slightly lifted so that the mortar falls to the bottom.
- The gaps around the pipes are covered with rubble to the top and rammed.
- Reinforcing rods are placed in the pipe and the pouring of the solution is completed.
- The solution in the pipe is rammed with a rod or vibrator for even distribution.
If you want to equip a closed basement in a bath with a column foundation, you will need to perform a number of manipulations.
To do this, between the installed columns you need to dig a ditch 30 cm deep, 10 cm wider than the supports. It is half asleep with rubble and rammed.

Next, a solution is poured into the ditch and sheets of flat slate are placed in it. They are screwed to the supports with screws in pre-drilled holes.
In the sheet material, you need to make a gap to install the ventilation pipe and insert it. Around the perimeter inside and at the top outside the structure is reinforced with a metal corner.
The inner space behind the base needs to be covered with a film and filled with expanded clay.
Briefly about the stages of building a bath
Any construction begins with the project. It serves as an instruction for all moments. The bath is different. The finished bath project can be selected by viewing the catalog of specialized companies. There is an opportunity to design the bath of your dreams yourself. We consider an option from a rounded log. In the project we indicate:
- terrain features for the construction of the bath,
- bath size
- type of foundation (the wooden frame has a small weight, which means the foundation needs lightweight),
- cylindering of natural humidity / chamber drying,
- type of roof
- summing up communications (water, stove, ventilation),
- interior decoration of the bath,
- launch of the bath.
We will not consider each stage in detail. They were described on the site in other sections. We will consider in detail the nuances of erecting a log house from logs.
What to choose for a bath: a log of natural humidity or chamber drying?
The issue of material selection is quite serious, despite the fact that a log of any kind is produced in the same way. On the machine, the top layer of the bark is removed from the log. The workpiece is flat, smooth, of a certain diameter in length.
 The rounded log for a chamber drying bath.
Sometimes the top layer is removed close to the core. This method reduces the possibility of longevity of the log. The middle of the trunk is very susceptible to decay. Therefore, the log is treated with protective agents against rot, insects.
- After the machine, the rounded log is left to dry naturally or sent to the chamber under the influence of temperature. The second option for drying wood is more expensive for the manufacturer, which dictates the difference in the price of two types of material. The buyer has the right to choose what to do for the construction of the bath with his own hands. The first option is cheaper, but it takes more time to shrink (more on this later in the article), the second log is more expensive and it’s faster to put the sauna into operation.
- The second nuance that affects the choice of material is the appearance of the log. The cylindering is smooth on all sides, and may have a profiled lock (spike and groove). Do-it-yourself profiled cylindering for a bath can be more profitable. It is enough to combine the logs along the profile, to press against each other. The lock retains heat due to the tight closing of the links of the bath. Save on insulation, which will be required relatively less than when installing a smooth log.
- The third caveat is the readiness of parts for assembly. Many manufacturers of logs offer to buy a finished log house for a bath. The part is numbered for convenience, have a finished corner connection. You don’t have to think about cutting down a corner lock for a log house bath. You can do this with your own hands if you know how to handle a chainsaw, are confident in the jewelry of your work. The future heat and its preservation in the steam room depends on how the links of the bathhouse sit down. You can buy a processed cylinder of natural moisture and cut out the side joints yourself, saving a tidy sum.
We talked about the choice of material, we turn to the main point - assembling the log house with our own hands.
Do-it-yourself bathhouse of logs: the steps of erecting a log house
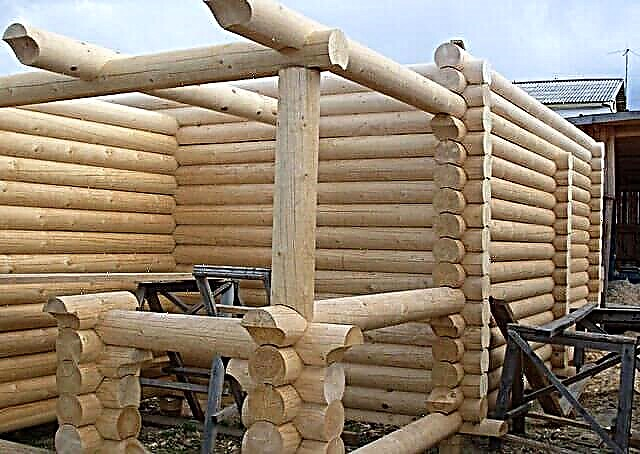
Assembling a bath frame from a rounded tree is similar to a game in a children's designer. Each part is the same size and you do not need to adjust the links.
 You can buy a ready-made box for the assembly of logs.
A waterproofing is laid on the laid foundation and proceed to the installation of the first crown. It plays an important role in the quality and durability of the building. The shrinkage of the structure depends on the lower crown. We derive the lower links strictly in level. If a log profiled is chosen for the construction of the bath complex, we carefully connect the links to the castle. Check the fit. If there are gaps, lay insulation. More recently, moss or tow was used for this. Now the market is replete with their substitutes, but it is better to give preference to jute insulation. It will reduce the load of the upper row on the lower, better retain heat.
When buying a smooth billet, you will need to do your own connection cuts. Need an ax and a saw. A groove is made in the log with an ax, if the junction of logs goes to the castle. Choosing the usual connection, the log is cut only along the edges. The technique of angular connection is different: in a round or in a bowl. Well, if you own some kind of technique. Much has depended on the skill of drinking paws. If the features of logging are unfamiliar, then you should watch the video guide:
Having mastered the material and cutting down the connecting lock, we collect the rows in series. The bath will stand for a long time if the rows are fixed with pins. When shrinking, the logs will not lead or distort.
First, two logs are laid out on the surface parallel to each other. Then, perpendicular to the first details, we lay out two more logs in the legs of the lower links. They should lie very tight. Do not forget about the insulation, which is laid both in the places of the paws, and between the logs. Repeat the steps until the bath frame is assembled to full height. We monitor the level, not allowing to collapse a single wall.
Shrinkage of the bath from the cylinder - this is important
Speaking about the construction of a bathhouse made of logs with your own hands, you should not forget about the features of wooden structures. They all shrink. It depends on the material selected for construction. The rounded log dries up to 10 cm per meter of wood frame. So the bath will shrink 10 cm.
 Any felling made of wood will shrink the walls in the first three years. the most intense shrinkage in 1 year.
The speed of the bath shrinkage process depends on the selected wood. A bath made of wood of natural humidity will settle for longer and under natural conditions. Chamber drying will shrink faster. Sometimes customers go to the interior decoration in the bathhouse immediately, having finished installing the roof, windows and doors. After reviewing the comments of experienced bathhouse attendants and bathhouse builders on the forums, we came to the conclusion that even when using dried wood, you should not rush to finish. Wait until the body shrinks completely and calmly proceed with finishing.
The process of settling the log house can take up to three years. The maximum drying of wood takes place in the first year. What affects the rate of shrinkage of the bath? There are many nuances. Let's talk about them:
- Selected material. The cylinder of natural moisture dries out longer. Chamber drying has already dried the workpiece. But the diameter of the logs is different and drying does not always reach the core of the tree. Therefore, after assembly in air, the wood dries out additionally, reducing the height of the structure.
- The location of the bath. In a lowland, the log house will absorb moisture from the soil. Thus, the process may be delayed. On an open hill, shrinkage will be faster.
- The type of wood used for logs. Each wood has its own density and percentage of moisture, which cannot but affect the process.
- DIY construction season for the bathhouse and lumber harvesting time. Experts recommend choosing winter time to speed up the commissioning of the bath.
How to properly shrink the bath yourself?
Choosing the opportunity to build a bath of logs yourself, you can reduce the risks of improper shrinkage of the structure. There are devices that compensate for such a process. They are called so - compensators, or easier to jack. The principle of operation is similar to the operation of a car jack. The only difference is that the construction compensator remains in place even after fulfilling its purpose. Install the compensator on the lower or upper supporting link of the bathhouse. One plate is attached to a horizontal log, the other to a vertical post. As the walls shrink, they reduce the height of the jack with a bolt and nut.Track the process for the first year. At other times, this should be done less frequently. The compensator will help to avoid problems of uneven walls or skewed roofs. The log cabin for the bath, assembled with your own hands, will not change its proportion and geometry. The finished bath can be seen on the video:
Caulking of the walls of the bath from logs
We build a bathhouse made of logs with our own hands and do not forget about the caulking of interventional spaces. To do this, use moss, tow or modern substitutes. It is best to buy a jute insulation. Caulking of walls is carried out in two stages:
- after the construction of the log house,
- after shrinkage of a wooden structure.
First caulking close possible gaps and gaps between the links. Although during the installation they tried to make the fit of the logs as maximum as possible, it is not possible to avoid cracks. Caulking will close the gap.
 Wall caulking is performed around the entire perimeter of the log house.
The second caulking is done after the bath is completely shrunk. Most often this is done a year after the construction of the bath with their own hands.
After completing the first caulking, we proceed to the installation of the draft roof, if we leave the bathhouse under shrinkage. The final roof can be erected immediately if a cylindrical log of a chamber drying was chosen for the bath.
Features of the installation of the roof and subsequent decoration of the bath are discussed on our website in separate sections.
Assemble a bath from a logs with your own hands and save the family budget. To help, we suggest watching a video material on the construction of a log house from logs.
Walling
All logs for the walls will be located on the flange. However, before laying the crown, it is necessary to provide waterproofing. It can serve as two layers of roofing material, smeared with bitumen mastic. If the insulation consists of several segments, they are laid with an overlap of 20 cm, having missed the joints. On top of the roofing material for additional protection of the lower crown, it is desirable to lay a board 1.5 cm thick, placing it with gaps of 2-3 cm. These indents can subsequently be foamed.
After that, the material prepared in advance with the selected connecting mechanisms must be put on a salary. Stacking is done according to the principle of “comel to the top”, that is, alternating the location of the ends of the logs with a larger and smaller diameter from the lower element to the upper. This is necessary in order to maintain the same height of the walls from different sides.
However, just joining at the side joints is not enough. The whole structure should be fastened vertically with the help of spikes. In diameter, they are made at the rate of 1/10 of the barrel width plus 2 mm. The depth of the holes for the spike is equal to the thickness of two logs. From each edge, the spikes are mounted in 10-20 cm, and along the wall the distance between them is 80-100 cm. Such fastening reinforces the construction of the log house so that window and door openings can be installed without complications. In addition, the spikes prevent the logs from mixing in the horizontal plane during the shrinkage of the log house.

In longitudinal grooves you need to place a heater - batting, tow, moss or any other. It is desirable that the exterior of the walls is neat, and the excess can be removed from the inside.
The position of the logs should be strictly vertical. You can follow this with a plumb line or level. In this case, the winter side should always be placed outward.
Note that in the process of shrinkage, the height of the log house can change, so during the construction process it is made 15 cm higher than the planned indicator.
The arrangement of the roof and ceiling
It is necessary to determine the type of ceiling before the installation of the roof.
There are three options for the execution of the ceiling structure:
- Overhead. The simplest, but rather fragile design, which involves laying boards 5 cm thick directly on the upper crown. Between themselves, the boards are tightly docked and nailed. A vapor barrier and a layer of insulation are placed on top of the ceiling. The width of such a ceiling should not exceed 2.5 m, and a niche under the roof cannot be used.
- Hemming. It is mounted on floor beams laid on the walls using the “bowl” method. The board will be hemmed to the bottom beams. A foil vapor barrier is placed in the space between the beams on the flooring, a layer of clay is poured on top, and then mineral wool is placed for insulation. If you sew this “sandwich” with another layer of boards, you get the floor for the attic.
- Panel. It is a wooden block, which is purchased in finished form and mounted on the spot.
After arranging the ceiling, you can take on the roof.

As a rule, the roof on a log bath is made of two types:
- Single slope - if the bath is adjacent to a residential building. It is important to correctly calculate the angle of inclination, so that the whole structure seemed to be unified.
- Gable. In this case, the upper crown will serve as a Mauerlat. At the bottom, rafter structures of two legs, a crossbar and a base are assembled. In the bars saw grooves for the installation of triangles. Assembly begins from the edges, gradually moving towards the center. To hold the structure using temporary jumpers. At the end, a roof lath is attached to the rafters. The base can also be used as a ceiling beam. For too long rafters that extend beyond the construction by more than 1 m, additional supports are installed.
You need to choose roofing material based on the climatic conditions of the region, as well as the features of the project. You can choose from soft tiles, corrugated boards, metal tiles or other materials.
Finishing the log house inside
Although the appearance of a log house made of logs is quite attractive, both outside and inside, still the wood needs to be protected from parasites and climatic conditions. For this, impregnation and varnish are useful. However, at first all joints and joints are caulked, that is, compacted.
For these purposes, moss, tow, tape sealant or synthetic sealants are used. Caulking is performed starting from the lower crown towards the upper. The work is performed on both sides of the bath around the perimeter. In this case, the logs will sit tight and will not move.
It makes sense to start all the decorative interior work in the bath only after the shrinkage of the log house, otherwise the used finishing materials may be damaged due to a change in the linear parameters of the structure.
Interior decoration may include decorating the beams with a stain to give them a twist. The seams between the logs can be decorated with twine. Thanks to the decor in the bath, you can create a certain color.
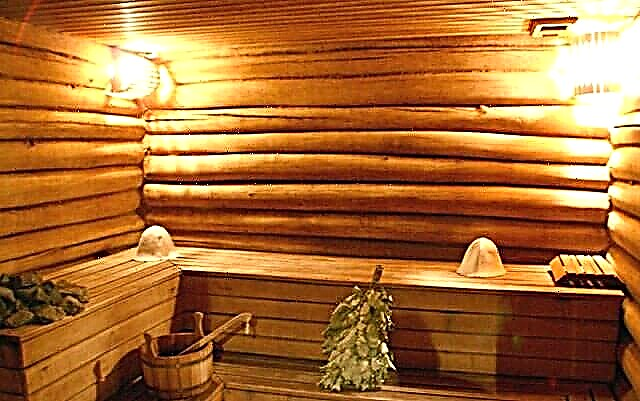
Inside the steam room you can place sunbeds in several levels, so that more people can fit there. Often, the walls are lined with wooden clapboard. However, in this case, one cannot do without vapor barrier, otherwise condensation will form inside the walls and the walls will begin to rot.
The next step is to install the stove. For security reasons, walls on either side of it are surrounded with refractory bricks. This not only looks beautiful, but also protects the wood from ignition due to overheating.
To save time and material, the floor can be poured with concrete screed. However, if you want to create an absolutely harmonious space, it is better to install the right amount of lags on the floor, the gaps between which are filled with mineral wool insulation and sew board flooring. The boards are mounted in the groove. This floor can be opened with stain and varnish. It will be not only beautiful, but warm in feelings.