Decorative lighting in the ceiling design replaces sconces, floor lamps and even main lighting
Greetings. In this article I will talk about how to make a two-level ceiling from drywall with backlight. And to make the article really useful, I offer you not the most difficult actions for self-installation.
Following the instructions below, you can assemble the supporting frame, put the wiring on the lighting fixtures and sheathe the entire structure with drywall. Before, how to assemble a multi-level ceiling made of drywall with your own hands we will decide on its design and select the necessary materials.
What and from what we will build

The most common version of the configuration of the ceiling with spotlights
What should be a multi-level ceiling assembled from drywall? The finished structure should have the following qualities:
- Strength, reliability and durability of the structure,
- Reliability and safety of operation of the installed backlight,
- Attractive appearance of the finished structure,
- The design of the assembled ceiling must comply with the general design concept of the premises to be equipped.
As materials that will ensure the strength and reliability of the structure, we will use a metal profile and ceiling gypsum board with a thickness of 6.5 mm. For the backlight device, I recommend using an LED strip.
Why is it advisable to use thin drywall, and not sheet material with a thickness of 9 mm or more? The small thickness of drywall was not chosen by chance, since this will reduce the weight of the suspended structure and reduce the load on the fasteners.
By the way, the large thickness of the GCR on the ceiling is not needed, since the cladding of the floor is practically not subjected to mechanical stress, which means that the thickness of the cladding is slightly more than half a centimeter - exactly what you need.
The use of a metal profile is also not accidental, since metal structures are more durable with less weight in comparison with a wooden lattice assembled from battens.
The main design differences
The highlight of the plasterboard ceiling is hidden and open. Open - spotlights that are fully or partially visible. Hidden because it is called that only its radiation is visible. Therefore, when installing the ceiling from drywall with hidden illumination of the lower level box, they do it with a shelf on which the lighting devices are placed.

To install hidden lights in the lower level box, make a special shelf for lights
This shelf can be open or closed and, depending on this, and the position of the light sources changes the width and brightness of the light strip on the ceiling.

How does the light flux change depending on the shape of the shelf and the location of the light source
Backlight box design
To make such a box for lighting the ceiling, two types of profiles are needed:
- UD - guides. They are mounted on the ceiling and on the wall, also in the middle of the structure and in the place of fastening of the side, if provided.
- CD - a bearing profile of greater rigidity. Racks and jumpers are made of it, to which a plasterboard sheet is attached.

Construction of the box for highlighting the gypsum plasterboard ceiling
In the version shown in the photo above, the shelf does not rest on anything. The rigidity of the GCR itself is enough to hold a light backlight. In this case, the weight of the lighting elements must be taken into account. The most difficult are fluorescent lamps, but they have recently been practically not used, as there are other options that are more economical in energy consumption and simpler to install (LED strips, duralight).
There is a second design. Here, the extension of the shelf rests on elongated crossbars. If the previous design seems unreliable to you, you can do this. Only in this case a little more support profile will be required. In the photo - an example of the organization of a two-level flow from drywall with backlight.

Scheme of the box for hidden lighting
Exactly the same scheme can be implemented in a single-level version. If the main ceiling is in good condition, you can only make a box around the perimeter. An example of an assembled frame for highlighting below. It remains to make the inner side, and hem the frame from the bottom.

The backlight frame is ready for GKL skin
The ceiling made of drywall with a backlight does not always have straight lines. They are simply implemented most easily. But the same schemes are done with curved lines. It turns out very beautiful false ceilings.

Two-level backlight example
Only at large distances from the load-bearing walls should the load-bearing profile be additionally fixed either to the ceiling or to the profiles of the previous level. It is more convenient to do this with suspensions.

With a large width of the backlight box, the supporting profiles are additionally fixed with suspensions
Sources of light
When planning to illuminate plasterboard ceilings, we must remember that this is not lighting in any way, but only a way of decorating the room. The stream of light is scattered. Initially, it is fused to the ceiling, and then into the room. And almost nothing adds to the general illumination of the room. With its help, you can visually "raise" the ceiling, make it one of the components of the interior, but this element can not be considered lighting. You will have to take care of lighting separately: install built-in lamps, wall or traditional - chandeliers.
The backlight can be done using different light sources, but three types have recently been used:
LED strip and duralight
This is a series of series mounted LEDs. Their feature is that they are powered from 12 V or 24 V. This power can be provided using an adapter that converts the voltage of a household network 220 V to a lower one. There are tapes of monochrome glow (white, red, blue, green) which are marked SMD or universal RGB when marked.
Monochrome always emit one color, the color of universal ones can change. RGB tapes work only with the controller and control panel. On command from the control panel, they change the hue (the number of colors can be different - from tens to hundreds), in some models the intensity of the glow can also change.
By type of execution, LED strips are:
- Ordinary. They do not have a protective coating; they can be used only in dry rooms.
- Water resistant. Their surface is varnished. It can be used for lighting wet rooms - kitchens, bathrooms.
- Moisture resistant. Sealed in a polymer tube (called duralight) or housing. They are rarely used to illuminate rooms, more often in aquariums, pools, etc.
The choice is clear. Choose the type of tape depending on the conditions of the room. You can read more about types, colors, marking, connection here, and we will talk about what good or bad LEDs are in backlighting.
First about the advantages:
- Low power consumption. They are very economical. Given that this is just decoration, I don’t want to lay out large amounts for its contents.
- Do not get warm. Only the power supply can warm up, the LEDs themselves do not heat up. This is important if the ceiling is wooden.
- Long service life. It is estimated in thousands of hours. With normal power supply they burn out very rarely (do not exceed the current strength for which they are intended).
- Low price. Tape SMD 35 * 28 with a length of 5 meters and a density of 120 pcs / m costs about $ 2-3. About the same amount you need to pay for the adapter. True, these are the prices of AliExpress. In stores, everything is much more expensive (2-3 times), although you will not go broke either.
- Simple installation. An adhesive composition is applied to the back surface of the tape. Remove the protective layer and stick to the right place. If the surface is rough, you can “shoot” with brackets from a construction stapler, but it is better not to pierce the tape itself.
Now about the shortcomings. First, and most important: LEDs rigidly illuminate all flaws on the surface. Therefore, the quality requirements for ceiling decoration are very high. Second minus: the availability of adapters. They need to be attached somewhere. That is probably all.
Neon tubes
These are glass tubes filled with a mixture of inert and luminous gases. The brightness of the glow changes with a change in the current strength, which is regulated by a convector. These devices are installed every 5 meters, their power consumption is about 100 W, they do not make noise during operation.
Also, a step-up transformer is needed for operation: for the operation of neon, normal voltage is not enough. Transformers set every 6 meters. But they can buzz at work, and even - heat up and electricity, of course, “pull” quite decently. The whole system as a whole consumes a sufficiently large amount of electricity, which, combined with the fragility of the tubes and a sufficiently high complexity of installation, makes it not very attractive compared to LEDs.
But recently appeared neon cords. They go immediately with the controller and all that is needed is to press a button. They work from finger batteries. But the power of such a backlight for the ceiling is definitely not enough. They can be used in conjunction with LEDs to highlight interior details.
Installation of ceiling lighting around the perimeter with step by step photos
The main ceiling in this version was putty, because the first tier was not made. They fastened only the box around the perimeter: the height is already small and 7-8 cm, necessary for the organization of the suspension is critical.

Plan box for lighting
There is a place for a cornice near the window, the width of the box is 60 cm, relative to the main ceiling it is lowered by 12 cm, the height of the side is about 5 cm, the protruding part is 6 cm, rounding is made in the corners.

Sectional view of the backlight box
The first method was chosen - a step under the backlight without support. Since the backlight is planned from a regular LED strip, its bearing capacity is more than enough.
First make markings on the ceiling. All the given sizes are laid off, with the help of a paint cord draw lines. Please note that the line on the ceiling is laid at a distance of 54 cm, not 60 cm, as in the first diagram. It is obtained taking into account the fact that the step is advanced 6 cm forward.

With the help of a paint cord, we make markings on the ceiling and walls
When drawing roundings, their center is made not in the place where the profile is fixed, but taking into account the protruding step: this way the element is more expressive.

How to draw a rounding on the ceiling
On the applied lines fasten the profile guides (CD or PNP in the marking). Mounted on the dowels in increments of 50 cm. Drilled immediately, through the metal. After installing the plug, the dowel-nail was twisted.

The contours of the box are laid out with profiles.
Where it is necessary to form a rounding, the walls (sides) of the profile are notched, the back remains intact. After that, the profile can be laid out around the circumference.
From the front side to the guide profile on the ceiling we fasten the fastened strip of drywall 12 cm wide. This will be the back edge of our box. We fix it around the entire perimeter with screws with a screw at a distance of about 10 cm.

We fasten the GKL strip 12 cm wide

We fix a strip near the window that will close the curtain rods for curtains
On the back of the mounted side we fasten the vertical posts from the CD profile (ceiling). Their length is small - 9.8 cm (12 cm box height, minus 1 cm for installation of profiles, and another minus 1.2 cm thick GKL screwed to the bottom).
In each segment, the lower part is trimmed. The side walls are removed so that another guide profile can be screwed on. As a result, its lower shelf should be flush with the profile bolted to the wall. The step of installing vertical racks is about 40-50 cm.

Fasten short vertical pieces around the perimeter

Another perspective
The next step: we fasten the PNP profile, which goes along the bottom of the bot. It is also installed on self-tapping screws in increments of 10-12 cm.
Next, we proceed to install horizontal jumpers, on which the GKL sheet will be held, covering the box from the bottom.

Setting horizontal jumpers
They connect two guide profiles: one that is bolted to the wall, and one that is attached to the main side. Make from the supporting profile in increments of 40-50 cm.

Collected around the perimeter
We proceed to the design of the curves. So that the strip bends along the necessary path, we take a strip of drywall with a width of about 15 cm. We cut it in increments of 5 cm and break the gypsum. It turned out pieces of gypsum, which are held on cardboard.

Cut cardboard every 5 cm on one side and break gypsum
Now we fasten such pieces to the profile. For each fragment - one self-tapping screw, approximately in the middle of the width, so as not to burst.

Fasten the sliced strip
Using the laser level, we transfer the height markings to the inside. If there is no laser level, use a watermark and draw a line with a pencil.
Then we take a piece of the bearing profile 9.8 cm long, we just cut it both from above and from below. Around the middle of the arc, we wind one edge behind the profile, we fasten it with a self-tapping screw.

How to make a rounding
Then we take a piece of profile cut into fragments (as they did when forming a circle on the ceiling) and fix it according to the mark.

Finished rounding "inside"
Now the excess pieces of hyproc can be removed. They are cut to a level with the bottom edge of the profile, gently notching the paper and breaking off small fragments.

Cut off excess pieces

So it looks from a different angle
The next step in the manufacture of illuminated drywall ceilings is putty. The ceiling and the main side are putty. This is the most convenient moment for this. Later, the bottom hem and protruding cornice will interfere.

Putty the side and the ceiling
Next, we begin to hem the box from the bottom. Strip width - 60 cm. Cut and fasten with screws. The procedure for working with the herdboard is standard. Some explanations are only required for sewing corners.

We fasten the sheet, which becomes well in a corner and in external dimensions a little more than the required rounding
It is most convenient to cut a square, then cut it on one side. First we fasten it in a straight line. Then, gradually, in an arc, drawing the desired shape of the edge.

Draw a shape and crop
First you can draw, then bite along this line in small pieces. Smooth irregularities with a wallpaper knife.
Next, we fasten the guide profile. An additional side will be attached to it, which will close the backlight.

We fasten the guide profile along the edge
No news: for rounding, we cut the sidewalls, bend with the desired diameter and install in place, fixing with self-tapping screws.

So it looks from the bottom
If you plan to make LED lights on the plasterboard ceiling, it's time to fix the tape. Then it will be very inconvenient. It is glued in the right place, if necessary, installing some kind of inclined plane.

We install the tape until the installation of the outer side
Further, a strip of drywall 5 cm wide is attached to the profile. Of the features - fastening in the middle, and not above and below: the height is too small. Bends are also familiar. We cut the strip every 4-5 cm, break the gypsum and fix it.


In this embodiment, to facilitate work and give the ceiling a finished look, fillets (ceiling plinth) are glued to the side. Similar are glued at the junction of the box and the wall.

Now it remains to putty everything and achieve a flat surface. Virtually everything. The ceiling of the drywall with the backlight is ready, it remains to install the backlight itself. And it can be different.

Another option can be seen in the video format, but with a working backlight.
The installation of a two-level stream is demonstrated in the following video. The steps are shown schematically, but the assembly of the first level is clear. So that might be helpful.
How can I arrange a ceiling made of drywall with backlight (photo)

The ceiling with light can be wooden

If desired, the same principle can be done and wall lighting

Smooth lines look amazing

For interiors in the style of hi-tech and minimalism fit broken

Drywall LED ceiling lighting is only a spectacular design touch. Lighting must be taken separately.

Most effects options using different light sources

Corridor Lighting Options

Beautiful, but difficult to perform

Drywall two-level ceiling with backlight

Bedroom ceiling lighting

Combination of lines and circles

The most spectacular options are combinations of different fixtures
Features
The two-level ceiling is a unique design, which is created from two tiers of drywall. The installation of the decorative composition is carried out in such a way that not only all communication systems, electrical wiring can be hidden at the same time, but also makes the coating even. In addition, performing even the simplest apartment repairs, with the help of such ceilings it is possible to rationally plan a room by visually dividing it into separate zones.
The only drawback of the designs is that they reduce the height of the space, so it is advisable to install them in spacious rooms. You can, of course, perform such installation in small rooms, but then you need to apply special design tricks: expand the boundaries of the room due to light shades in the decoration of the walls and flooring.


Before installing two-level ceilings, you should consider the following features:
- Humidity level. In the event that a constant temperature drop and high humidity are observed in the room, it is recommended to choose a moisture-proof drywall for work. You can also assemble a structure from ordinary sheets, but then they will have to be additionally treated with a protective primer.


- Features of the layout of the room. Depending on the shape and size of the room, the appropriate ceiling model is selected. At the same time, we must not forget that installing the frame will reduce the height of the space by about 10 cm. To save height, you can install the second tier simply on an even surface.
- Lighting system. Installation work should begin with the design, which will indicate the location of the lighting fixtures. Great attention needs to be paid to this moment, since the general appearance of not only the suspended composition, but also the interior as a whole, will depend on the correct installation of fixtures and lamps.


Bunk ceilings are ideal for contemporary design. They look stylish and impressive indoors, creating an unusual atmosphere of comfort and warmth in space.
To date, there are many options for installing such structures, the most popular of them are:
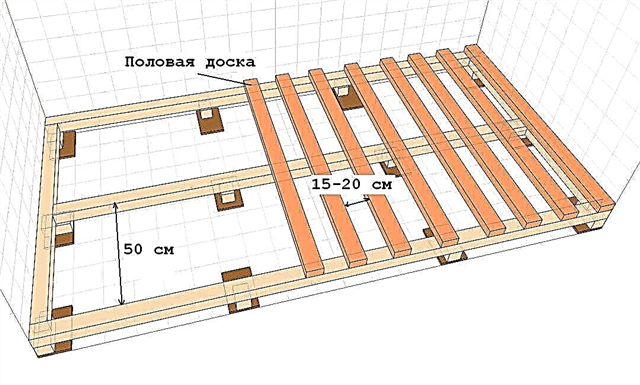
- Frame bunk ceiling. It has the form of a box with one step. Such compositions, as a rule, are chosen for rooms whose height exceeds 3 m, since the box device requires a free space of 50 cm. The ceiling often has a curved shape, and along its perimeter you can install both hidden illumination from LED lamps and spot lighting . Such designs also look beautiful, complemented by large chandeliers in the center. Thanks to the box-like structure, the corners of the room are well lit, and the interior is bright and interesting.
- Diagonal. The device of this composition is striking in its originality. The design scheme is as follows: the first level is attached, and then the second one, which projects to the side, is attached. In this case, the dividing line runs horizontally on one side, smoothly merging with the second tier, the distinction can be made using both straight and wavy lines. Thanks to unusual shapes, the ceiling allows you to visually expand the space. In this case, multi-colored LED lamps are recommended as backlights, which can be combined with night lights.
- Zonal. This view allows you to beautifully highlight a certain section of the room. The structure is fixed in such a way that it has the same level throughout the room, and a second tier is mounted above the area to be emphasized. A similar system is chosen for living rooms and bedrooms, where you need to distinguish between a workplace, a relaxation and sleep zone. The ceiling is also suitable for combined rooms, the style of which provides visual boundaries.


In addition to the traditional types of suspended ceilings, complex two-level systems are in great demand. In their structure, they have similarities with the above models, but are complemented by a variety of patterns, shapes and complex decor elements. Thanks to such designs, you can create an unforgettable and exotic interior. Typically, designers for modern projects choose curly, abstract and soaring ceilings.


The figured composition consists of two levels, which are installed in the form of plants, drawings, patterns or geometric shapes, while the first tier is the main one, and light-guides are attached along its edges. As a result of this, an amazing effect is obtained, additional elements can be illuminated by spotlights. Such ceilings fit perfectly into any style, therefore they are considered universal. Most often they are chosen for baroque and Empire style, in the design of which the presence of a simple decor with clear lines is important. A good option are designs for minimalism and hi-tech, where rigor is presented in everything.
Of particular note among the two-tier drywall constructions are the soaring ceilings. Their system is made suspended, LED lamps are installed along the contour, and the second level acts as a decoration. In addition, this system creates a visual effect in which the ceiling looks weightless, "soaring" in the air. Therefore, if the interior of the room needs to be filled with a magical atmosphere, there is no better option for decor.
As for abstract ceilings, they are most suitable for those homeowners who like unusual shapes. There are many design options for such designs, but systems with a spiral second tier are most popular in modern design.


In order for the composition to acquire its original appearance, it is best to use several colors when finishing it, and inserts with bright shades can also be made.
Lighting
A plasterboard ceiling of two levels will look stylish if complemented by good lighting. You can install lighting fixtures with your own hands, as this is not particularly difficult. All you need to do for this is to pre-draw the drawings of the placement of devices, as well as choose the most suitable option for a lamp or lamp.


To date, the following devices are most often chosen for the installation of backlight for two-tier systems:
- Spotlights. They allow you to make both primary and secondary lighting, beautifully highlighting certain areas in the room.
- LED strip. They are used to illuminate the ceiling around the perimeter. Tapes differ in color spectrum, therefore, depending on the design of the room, you can choose tapes that create light with different shades.


Training
Installation of a two-level drywall ceiling is carried out in stages, while construction work must be carried out correctly, in compliance with all installation technologies. In order for the structure to serve reliably for many years, surface preparation is performed before its fastening, after which it is only possible to assemble the frame. Therefore, first you need to control the surface of the coating, remove the old plaster, carefully close the cracks. When the rough finish is completely dry, the base is primed.

The next stage of preparation will be the choice of the frame design, according to which it will be possible to assemble the structure in the future.
As a rule, a step-by-step instruction is used for the manufacture of the frame, according to which the suspension system is assembled in two ways:
- First of all, a first level system is installed, then a second tier is attached.
- The second level is being prepared, it is fixed on special suspensions, after which the first tier is mounted.


Each of the above assembly technologies is good in its own way, but if you do the installation work yourself, then its choice will depend on the skills of the novice master, as well as on the size and shape of the room. For example, for small rooms it is not recommended to use a complex system of ceilings, since due to the double construction the height of the room will be “cut off” and it will look bulky. As for the rectangular rooms, choosing the placement of levels, you need to pay attention to the fact that the second tier should be less than the first.
Mounting
After all the preparatory work is completed, you can proceed to the direct installation of a two-level design. In the event that the installation is done with your own hands, it is important to take measurements correctly, determining the zero point on the ceiling. To do this, you need a water level with which you can draw lines. If you plan to make a system consisting of several geometric shapes, then a grid of lines must be applied around the entire perimeter of the ceiling. In this case, the distance between perpendicular lines should not exceed 60 cm, for parallel lines it is 50 cm.


Plasterboard sheets are also precisely measured, their parameters must fully correspond to the size of the frame. Thus, drywall is fixed at the edges and in the middle using self-tapping screws, and decorative figures are first made in the form of a template from cardboard, after which they are transferred to the structure. Before sheathing the frame, it is necessary to lay all engineering communications, consisting of air conditioning, lighting and ventilation systems. They are attached directly to the ceiling to avoid damage when covering the frame. As for the wiring, it can not be placed inside the profiles, the ends of the wiring are brought out, where the fixtures will be fixed.


Fixing of drywall sheets is performed using special screws. In the event that the composition needs to be sheathed with curved and curly details, they are first treated with a solution and given the desired shape using a roller with spikes. He will make many holes, so that the drywall sheet becomes malleable and easy to bend. First, the sheets of the first tier are fixed, then they proceed to the installation of the second-level blanks. If the ceiling area is large, then it is recommended to lay the sheets of drywall in a checkerboard pattern, observing the distance between the plates of 40-50 cm, so the material is firmly fixed and will hold well.

In addition, you need to prepare holes for installing future lamps and fixtures. Since the wiring was laid earlier, it remains only to attach its ends to the lighting devices. At the end of the installation, it is necessary to treat the self-tapping heads with a special solution, as well as putty the seams with the finish mixture. After this, grouting, grinding and installation of the fixtures is done.


Useful Tips
A plasterboard ceiling, consisting of two levels and a backlight, is considered a complex structure, therefore, in order to correctly install it, you must first draw up sketches of the future composition, then assemble the system. Despite the fact that the installation process may seem difficult, it is quite possible to cope with it yourself.

For beginners, when installing bunk ceilings, it is recommended to use the following useful tips:
- The second level of the suspension system plays a decorative role, so the design of its design should be treated responsibly, picking up unusual ideas. The mounting technology of the structure will depend on the shapes and sizes of the second tier, since often the figures can have a cutout or go down to the first level.
- Installation should begin with measurements of the perimeter of the ceiling and determining the height for each tier. For the calculations to be performed correctly, use a laser or hydraulic level. A mark is placed for each level of the system, after which a chopping cord is attached, and the work plane is formed.
- A drawing of the future ceiling is drawn directly on the floor slabs to fix the evenness of the lines, UD profiles are fixed on the surface.
- In order to give volume to the structure, it is necessary to make guides from CD profiles. At the same time, when working with profiles, it is necessary to leave a small margin of length.


- Profiles are fixed with special metal screws. If necessary, they can be bent in any direction of the structure. In the case when the profile is placed opposite the ceiling, then its direction is aligned as follows: make incisions to the base every 5-10 cm, after which the segment is directed in the right direction.
- Cutouts in a plasterboard ceiling must be made of rigid profiles that can withstand the load. They are fixed to the ceiling using U-shaped brackets.
- All load-bearing profiles, unlike conventional wall structures, are mounted with a gap of 40 cm. To increase their strength, you can take a step of 30 cm. Such reinsurance will increase the strength characteristics of the frame and protect the structure from possible cracking under the influence of the weight of the second tier.

- Unlike walls, the bearing profiles of the ceiling are fixed directly to the ceiling itself, so the fasteners are subjected to a huge load. To make the system durable, it is necessary to additionally attach metal brackets to the profiles, observing a distance of at least 60 cm.
- The process of manufacturing the frame and lining it with sheets of drywall is desirable to combine. Therefore, it is best to first sheathe the second tier, and only then to finish the first main. Thus, the work is faster and more convenient.
- The most difficult in the design of a two-level ceiling may seem to be the bending of drywall sheets. To do this, they are traditionally soaked, and then leveled with a special roller, but all this can be done in a different way. If it is necessary to create figures of a small radius, then the drywall will bend well and dry. In order not to break it, it is necessary to make even cuts in parallel, observing a step of 5 cm. The resulting workpiece will easily bend and putty.

- In order for the original ceiling to complement the interior of the room, you should worry about its lighting. For two-level systems, LED strips are considered an ideal lighting option. They are best fastened around the perimeter of the lower tier, which forms a small niche. The result is an amazing light effect. In this case, the lower level should protrude beyond the perimeter of the frame by 50 or 70 mm. The edges of the drywall sheets are aligned at all borders, then the guide profiles are laid and the LED strip is mounted.
- The design of the bunk ceiling must be selected strictly in accordance with the style of the room. It should be in harmony with wall decoration and flooring. Depending on the functional purpose of the room, you can install structures that visually divide the space into separate zones.


Beautiful examples in the interior
A two-level plasterboard ceiling is considered an ideal complement to the interior of any room. Such suspension systems in kitchens look beautiful, but since this type of room is often exposed to moisture and high temperature, for decoration you need to choose the right material with special protection. For the kitchen, a warm palette of colors is well suited, so two-tier compositions are best designed from several shades of the color scheme. Separate inserts from various textures and colors will also look unusual in designs. A classic option for the kitchen will be a snow-white ceiling with bright illumination, fans of Art Nouveau can choose models that combine not only drywall, but also color exhibitions made of linen that will harmoniously complement the beauty of the flooring and furniture.


In addition, for the kitchen you can choose drywall systems, assembled not only from rectangular tiers, but also decorated with interesting shapes, lines and patterns. It can be geometric shapes, abstraction or waves. To emphasize the beauty of a complex structure, lighting sources need to be mounted not only around the perimeter of the lower tier, but also put them in decorative details. Thus, in the kitchen you can perform a small zoning. For example, the ceiling looks chic in beige and white colors, while the color insert is a continuation of the shade of furniture.

A special role in every home is played by the living room. Since it not only gathers the whole family, but also hosts a meeting of guests, its design should be special. To achieve an amazing effect in the interior of the living room, a bunk ceiling will help. It will make the room luxurious and stylish, and unusual combinations of colors and shapes will give the surface a chic look. Particularly beautiful in the living rooms are two-level drywall ceilings, in the design of which there is an elegant matte or glossy film. Thanks to the unusual decor, you can even turn a small room into a fashionable room.

The color of the hanging composition must be chosen in accordance with the harmony of colors. Therefore, the tone of the background of the room is determined, and then paint is added to the interior. Such ceilings can be decorated not only with geometric shapes, but also with Chinese symbols or unusual patterns. It all depends on the style of design and personal preferences of homeowners. Two levels are especially interesting in the living rooms combined with the kitchen. For them, you can choose the classic design in white by placing the LED line on the surface in the form of original drawings.

The bedroom belongs to the rest and sleep area, therefore, the installation of two-level ceilings in this room require a special approach. An excellent solution for it would be a suspension structure of two tiers, where the details of drywall will be made in bright colors, and decorative paintings from dark shades. Lighting of such a composition can be done either from spotlights, or supplement the system with small chandeliers that will help create an atmosphere of harmony and romance in the room. It looks interesting in the bedroom a complex design in white, the upper tier of which is located above the bed.

Despite the fact that the bathroom is subject to high humidity, it is still possible to install complex ceilings, consisting of two levels and a backlight. To do this, you need to choose drywall, designed for wet rooms. It is advisable to use light shades in the design of such ceilings, which would go well with the decoration of the walls. For the bathroom, it is not necessary to make complex compositions; you can get by with the second tier, laying it out in a figured form.

See how to make a two-level plasterboard ceiling with backlight in the next video.
Materials and Tools
To install a two-level ceiling, you need to prepare all the necessary materials and tools. Their choice must be approached with all responsibility, because the quality of the final result depends on the quality of the materials, which means the longevity and reliability of the ceiling.
First you need to familiarize yourself with the design of the coating. It includes:
- metal profile (UD guide and ceiling CD),
- fasteners (screws, screws),
- "Crabs" are connectors,
- direct or springy suspensions,
- metal dowel wedges,
- soundproof materials (if such a goal is set),
- self-tapping screws
- finishing materials: primer, putty and more,
- GKL.
Also, when choosing materials, it is worth considering that for rooms with different purposes, drywall with different properties is needed. So, for the arrangement of rooms, hallway or kitchen, a simple drywall construction is suitable, and for bathrooms - moisture resistant.
Especially when choosing it is worth paying attention to the size of the room. It is better to take a little more material (about 10-15% more than necessary), because it is this amount that will be spent on trimming and waste.


When buying frames, special vigilance should be shown when evaluating products for defects, kinks and bends.
For independent installation work, you must have the following tools:
- square or tire,
- roulette,
- pencil,
- construction knife
- screwdriver
- hammer drill
- building level,


- spatulas, brushes and other devices for painting and decorating,
- plumb
- scissors for metal,
- ladder,
- gloves and glasses for protection.


Useful Tips
For beginners, to simplify the installation task, it is better to apply all the lines of the drawing. It will be easier to work with them, because it will be possible to do without a drawing on paper and not be distracted by it every five minutes of the process.
Before starting the calculations, it is worth giving the finished project to a professional for “verification”. He will help make the necessary changes or suggest the best solution.
It is better to abandon the use of incandescent lamps - they can carbonize materials. In return it is worth using halogen lamps.
During painting, the first coat is best applied in one direction, and the second perpendicular to the first. The paint applied in this way does not leave stains and lays down with a dense high-quality layer.

In order not to cut your hands on the edges of metal profiles when working with them, it is worth putting on protective gloves. Screws in drywall need to be screwed at a distance of 15 cm from each other - so fasteners and fixation will be more reliable.
The jumpers must be strictly on the same level, in order to check this, you should measure their level with a tool. Be sure to use the level when installing the structure. It will help to avoid the appearance of dangerous defects. If a slight bending of the drywall sheet is assumed, then this is easily done without additional fraud. However, if the curvature is significant, it is better to prepare for this process in advance and learn the subtleties and details.
A two-tier gypsum plasterboard ceiling helps to solve a lot of aesthetic and design problems, correct room imperfections, such as the curvature of walls or ceilings, makes it possible to evenly distribute lighting throughout the room, making it quality and harmless to the eyes.


It is necessary to remember all the features of working with drywall and take into account its advantages and disadvantages.
Good examples and options
Here are some ideas for finished two-level ceilings that may inspire you to create a new unique design in your apartment or room.
Bright orange design with waves.


For lovers of geometry.

Two-level ceiling with an abstract "curl."


For a two-level drywall ceiling with hidden lighting, see the next video.