The first idea of the house develops at the sight of the gate. They not only play the role of the visiting card of the owners, but also ensure the safety and security of the whole house. If it is not worth saving on the quality of the structure, then you can reduce the cost item with self-assembly. And already at this stage a number of questions arise: what kind of gate to stop at, which tools to prepare, and the main thing is how to install the gate in order to ensure its reliability and durability.
Preparing for the installation of sliding gates
 First of all, when installing sliding gates, need to make a plan, which will include all cash costs, as well as a list of necessary materials and tools.
All this needs to be done more to save time, so that later you simply do not run to the store to buy the necessary materials.
Mandatory points of the plan should include:
- terrain data for installing the gate (freezing depth of the soil),
- metal fittings in a full set,
- necessary tools
- material for covering the frame.
It is especially necessary to carefully monitor the selection of not only tools, but also component parts, because the life of the sliding system will directly depend on their quality. Usually the details are selected with the conditions compliance with load parametersso that in the future the gates do not sag.
All the mechanisms that are part of the design of the sliding system are attached only by electric welding, and here it can need specialist help. If there is no experience in controlling the welding machine, then it is better not to take up this part of the work.
It is also important to understand that when installing the gate, you need to consider how much space you need to leave, because the door leaf goes into the inner part of the courtyard. In this case, the canvas should completely go under the wall.
Everything needs to be calculated in advance, because due to the use of electric welding, the gate system becomes non-separable and after their installation it will not be possible to fix something.
It is important to pay attention to the fact that sliding gates can work from several types of connection, so you need to decide on the optimal option from the very beginning. There is an option to connect the system to an electric drive, but many modern models also provide connection to the alarm systemwhich is much simpler and safer.
Steps and basic installation rules
As soon as a plan is drawn up, the whole process of installing sliding gates with your own hands is sorted in order. There is nothing complicated in the installation, but still you need follow the basic installation stepsto avoid the resulting errors.
To begin with, you should consider all the steps that should be followed in strict order when installing sliding gates.
 First of all, it is important to pay attention to the arrangement of the foundation. Typically, simple door options do not require such preparatory work, but installing a sliding system requires a foundation at least at a shallow depth.
- The second stage is the laying of the electric cable in the event that the method of operation of the sliding gates from the electric drive was chosen, although this may also be required when installing the security camera.
- Installing a device with rollers for rolling the gate.
- Installation of a cloth on a roller system. At this stage, there is no need to adjust the gate during the production of the sash canopy.
- Next, you should fix the accessories, which is responsible for catching the target. After installing all the necessary elements of the system, the gate is adjusted. Each roller is also checked for smoothness and quality of movement of the web itself in the rolling mechanism system.
- Installation of an automatic gate rollback system is carried out according to plans.
 First of all, it is important to pay attention to the arrangement of the foundation. Typically, simple door options do not require such preparatory work, but installing a sliding system requires a foundation at least at a shallow depth.
Arrangement of the foundation for sliding gates
 There is nothing complicated in arranging the foundation for sliding gates, but still everything should be done according to the rules.
First you need to complete the plan on the sheet where planned trench according to the size required for installing the gate.
To do this, consider some recommendations.
- When developing a trench, one must take into account the distance that deviates from the boundary of the opening. Usually the distance is half the width of the goal.
- The width of the foundation can be selected individually when installing the gate. In fact, this part of the size does not affect the installation quality of the entire mechanism. With a gate construction of 40 cm, it is necessary that the width is 10-15 centimeters more, on both sides.
- Depth when installing sliding gates does not particularly affect the quality of the entire structure.
Many experts argue on this subject, but nevertheless, practice shows that the depth and level of freezing of the soil does not particularly affect, therefore, usually the foundation dig up no more than half a meter. This is enough to fill the concrete at 40 cm depth.
The main stages of the preparation of the mortgage element
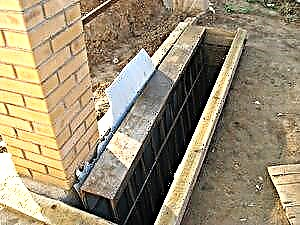 A mortgage element for retractable gate, it is simple foundation reinforcement, but there are some differences, unlike the process of building a house. The reinforcement of the foundation when installing the gate is important to produce immediately.
That is, the reinforcement is pre-welded, laid and that's it poured entirely with concrete. Gradually, the reinforcement of the foundation can not be carried out. To carry out such work, you need a channel with a height of about 18–20 cm and corners with the same size. The framework is welded from these components, and reinforcement with a section of 12–15 is selected for reinforcement.
Using the channel, a supporting structure is created that is suitable for the size of the trench, and only then reinforcement is carried out. The fittings are welded onto the frame in the area of transverse joints. There are no restrictions on the distance, but the reinforcement is usually laid so that the rods are no closer than 15 cm to each other. The fittings can be replaced with simple corners if necessary.
After the frame is fully welded, it is placed in a trench. Before you do this, you must not forget tamp the bottom using sand and a small amount of crushed stone. The height of the rammed material should not exceed 10 cm with a foundation depth of half a meter.
When installing the chassis, it is important to ensure that the construction stood up smoothly, so you need to constantly monitor everything with the help of a level. The curve of the structure significantly affects the quality of the foundation. If the curvature of the carcass is previously detected with the help of a level, then it is necessary to level the bottom by tamping the sand from the required side.
During the adjustment it is important to pay attention not only to the angle of the entire structure, but also to the channel, which should be flush with the fence line.
It is necessary to pay attention to one more detail, namely the level of the foundation with the road. They must be on the same level, otherwise there may be problems with the use of the gate.
True, even with the same level of road and foundation, problems often arise due to the fact that the road the canvas may sag at low temperatures. Therefore, the ground clearance should be no more than 5 cm.
Power supply and door frame mounting
 As mentioned above, when installing a door with automatic rollback, it is necessary conduct electrical wiring. Only in this case will it be possible to install an automatic system.
This, of course, significantly increases the cost of not only the work, but also the design of the gate. Install wiring immediately after completion of work with the foundation. The cable is laid in the foundation structure, and for laying it use a special corrugation.
The place where the cable bundle will eventually come out, it is important to calculate in advance, so that later you can stretch the entire cable into the room to connect to the electrical network.
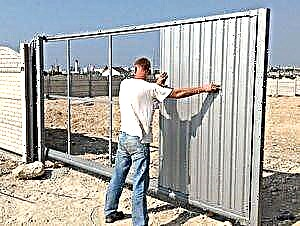
Then, when installing the gate with your own hands, you can proceed to build the necessary consoles sliding gates. Profile tubes may be required for this. Dimensions can be selected independently in accordance with the scale of the design.
If necessary, profile pipes are cut to the required length and prepared for welding. Specialists usually recommend that the pipes be cooked so that the horizontal posts end up on top of the vertical ones.
Such a method has already shown in practice that the design is stronger. In addition, when installing horizontal racks on top, corrosion is prevented on the frame. But in this case, it will be necessary to make protection for horizontal diameters.
To do this, after collecting the structure, you need to clean all the joints and paint frame special paint that prevents the spread of rust. The cross-section must be boiled every 50 cm, if the gate has a width of more than 1.5 meters. This will prevent sagging of the fabric in the future.
Installing the roller base and web
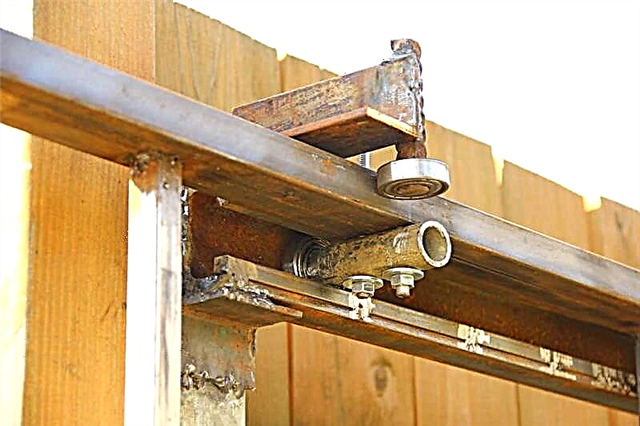
The roller base is considered one of the most important mechanisms in the sliding gate system. The thing is that this part accounts for the entire load from the canvas. That is why all fasteners must be reliable.
Most often, for this fastening, they are welded to the channel. Right after installation of rollers in progress, gates are installed on them, and after that, replacements are made that allow you to check stability and level.
In order for the gates to work on the roller system smoothly and without hitches, they are installed on the same plane, but accuracy can only be verified using laser pointers.
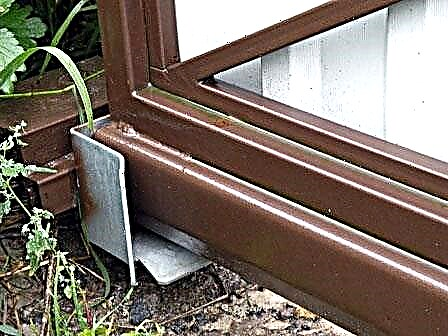
Mounting the upper stop and end roller
 A limiter is installed in the upper part of the structure, which stops the gate in case it starts to slide out of the guide. Also this part prevents web swinging with strong gusts of wind.
According to the instructions, the next step is fixing the end roller and plugs. The final roller is fixed at the end of the front of the beam, and then covered with a cork. Fixing is carried out using bolted connections, but only, on the one hand, and on the other side of the beam is a cork or device similar to this material mounted.
The last roller is not easy to improve the quality of sliding the gate, but also to roll onto the lower trap, and this reduces load on roller bearings.
Stubs also need to be installed, but they are needed for obvious reasons. Such a detail prevents snow or dirt, which increases the life span of the roller parts.
DIY installation of the upper and lower traps
Installing catchers is not a big deal. Their installation occurs by attaching parts to the bolt parts of the structure by welding.
The top catcher is responsible not only for safety, but also softens contact between gates and supports. In addition, the upper trap, as well as a similar lower part, reduces the effect of gusts of wind on the canvas.
The lower trap responds to similar actions, but, unlike the upper part, it is the main one and it accounts for most of the load when exposed to strong winds.
It is quite difficult to install the roller system, but this does not mean that it is impossible to install sliding gates with your own hands. Videos, photos, instructions, and a lot of information can help install sliding gates only with the help of their own forces.
Installing a roller structure in the end can greatly simplify life, because you don’t have to constantly leave the car to open the gate. In addition, such a system increases the status and value of the house.
Installation of conventional double-leaf gates
We can say that the registration of passage to the courtyard begins with consideration of the future construction and selection of materials from which the construction will be carried out. Start by choosing the material for the supporting gate posts. When choosing, take into account that they will have all the existing workload when working.
Supports are made of different materials. Poles are made of wood, profile or round metal pipes, and reinforced concrete pillars. The stone, brick, and decorative blocks supports inside still have a metal pipe, which bears the main load.
Country double gate
Gate with wooden racks
If the wooden sashes are light and weighing 10-30 kg or more, the supporting posts can be 10 × 10 cm wooden beams or D-16 cm logs. The wood is treated with special compounds to save it from decay and decay. When installing and concreting, that part of the column that will be in the ground or concrete is isolated from moisture by impregnation, painting and winding with roofing material. And proper care of the pillars will help them survive up to 20 years.
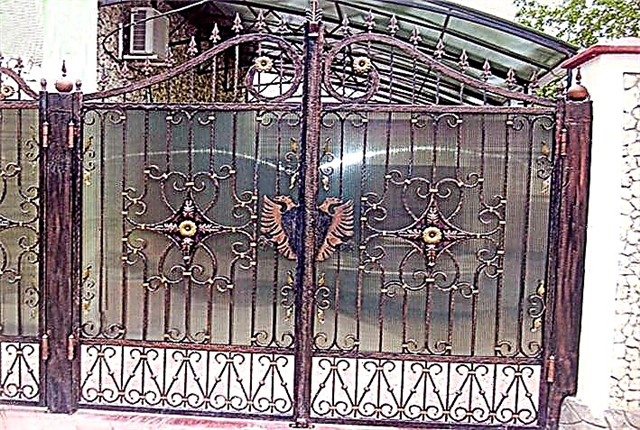
Wrought-iron swing gates
For sashes weighing more than 50 kg, support pillars are best installed in concrete with embedded elements, as well as D-12 cm pipes and a wall thickness of 4 mm, a wooden beam with a cross-section of 14 × 14 cm or logs from 20 cm in diameter. For heavy gates, pipes with a diameter of more than 14 cm with a wall thickness of 0.5 cm or a channel having sizes from 10 × 10 cm and above are purchased.
Features of swing gates
The hinged structure is, of course, not the only model for the entrance gate, but the most inexpensive, since its installation does not require special fittings, such as for the sliding structure.
To understand whether it is worth doing the swing gates with your own hands, you need to have an idea of what advantages such gates have, and what can unpleasantly surprise. So, among the main advantages we can note:
- The lack of complex design features - the gate manufacturing scheme is very simple.
- Accessibility of creating a product at home - swing gates with a competent approach can be made without resorting to the services of professional builders.
- Cheapness - the considered option of the gate is the most budgetary.
But, in addition to the pleasant aspects, there are also unpleasant ones:
- Impressive dimensions. Gates take up a lot of space.
- Exposure to wind. At the entrance to the house you will have to constantly remove the snow, otherwise the gates will open when raking it open.
- The mobility of the structure, which will have to be fixed with something, otherwise a strong wind will open it.
Preparation of necessary tools and materials
First of all, it is necessary to choose the material that will serve as the casing for the gate. To a greater extent, the choice should be dictated by the purpose of the design:
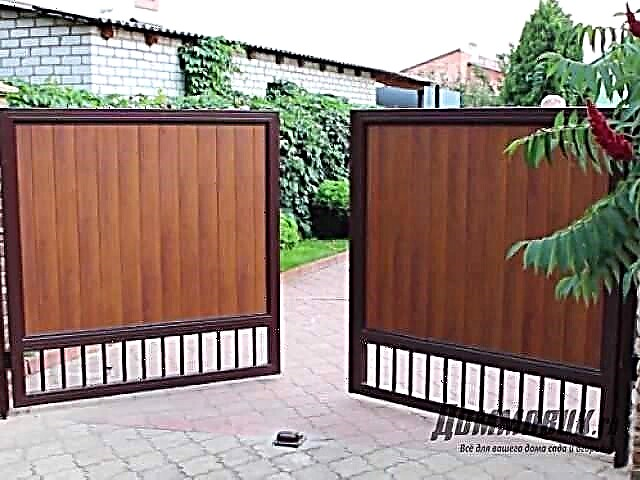
- Metal frame with wood filling. This is the best option for any homestead or country house. In this case, the tree can be successfully replaced with a wood-polymer composite.
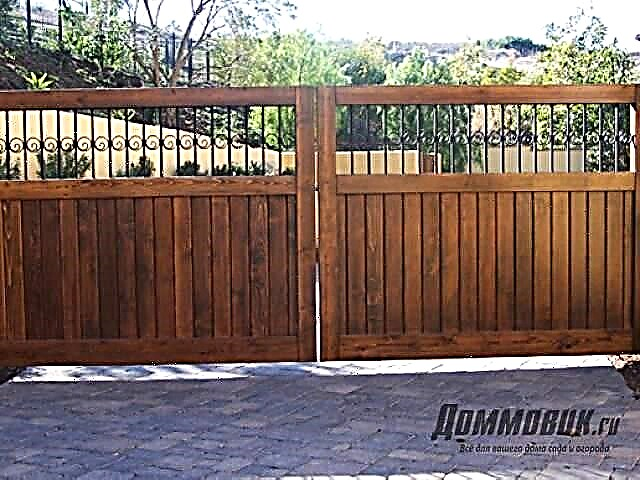
- Tree. Very effective, but short-lived option. In order to enjoy the excellent appearance of such a product for a long time, it is necessary to choose an exclusively “hardy” type of tree (for example, oak) and cover it with protective compounds.
- Polycarbonate. Particularly relevant when using automation: it is lightweight and quite durable.
- Decking. Perhaps the most popular material among all the above. And this is understandable, because it combines all the advantages that the material for the gate should have: lightweight, easy to use, varied in shapes and relief (you can easily pick up an imitation of stone, brick, etc.), affordable, durable.

Since the latter option is the easiest to process and install, we will start from it. For the manufacture of gates, we need the following materials:
- Profiled sheathing (C8 and C10). The material must be coated with a special polymer and galvanized. This will significantly reduce its "sensitivity" to mechanical stress.
- Pipe for the frame (the best option is 40x20x1.5 cm).
- 2 pipes for supports. Their thickness should be at least 4 cm, and the cross section should be 100x100 mm.
- Corners.
- Rivets (for fixing the profiled sheet to the frame).
- Cement mix for strengthening support pillars.
- Primer for metal.
- Paint for metal.
From the tools you will need:
- Bulgarian,
- Scissors for metal,
- Tools for painting metal structural elements (brush, roller, etc.),
- Welding machine,
- Drill,
- Screwdriver
- Shovel,
- Level, etc.
Preparatory work and installation of the structure
Before installing the main structure, it is necessary to prepare the supports. They are installed in pre-prepared pits and poured with cement mortar. The depth of installation of the support pipes should be at least 1 m (the soil freezes to such a depth). But first things first:
- Thoroughly clean the poles of rust (if any) and degrease with a special compound.
- Cover with a primer layer and paint to match the corrugated board.
- Prepare two pits to install the supports.
- At the bottom of the pits lay a pillow of crushed stone and sand (0.3 m).
- Lower the poles into the pits and fix the fittings, then fill with cement mortar.
Prepared supports must be left for 7-9 days, depending on how quickly the concrete will set (you can find more details on the installation of support columns here). Meanwhile, you can do the frame.
The frame for corrugated board masters very quickly. It is enough to prepare it in the same way as the support pipes, having cleaned and covered with special paint. Then it is necessary to cut it in parts (the cut should go at an angle of 45 degrees). Put prepared parts using a level and weld to each other. Grab the corners from the inside by welding and mount the crossbeams to increase stiffness (at a distance of about 0.5 m from the upper and lower parts of the frame). Be sure to complete the work by priming the structure and painting it.

Note! At this stage, you can prepare and weld a metal box to protect the locking mechanism from the weather.
It remains only to cut the corrugated board in the right size and attach it to the frame with rivets (use steel for greater reliability). On 1 sq.m should leave about 8-10 pieces. After that, you can hang the finished gate on the hinges, welded to the support posts.
In this form, the gates are already ready for operation, but if desired, you can add additional decorative elements (for example, an automatic opening system). As you can see, it’s not so difficult to complete the whole process of manufacturing swing gates, and the result will definitely please you. Good luck
Types of gates
Depending on the method of opening and closing, all gates are conditionally divided into three main groups:
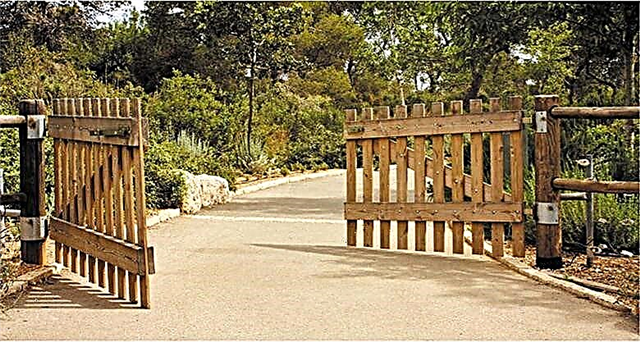
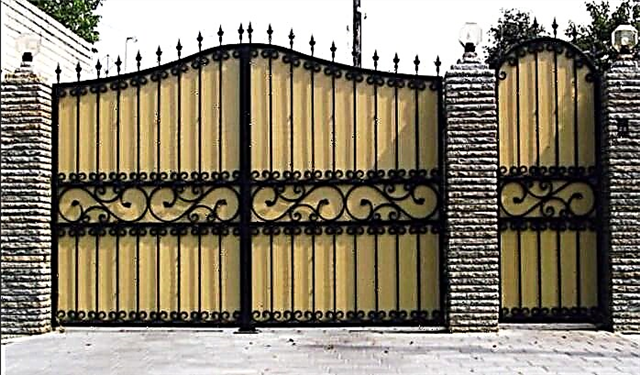
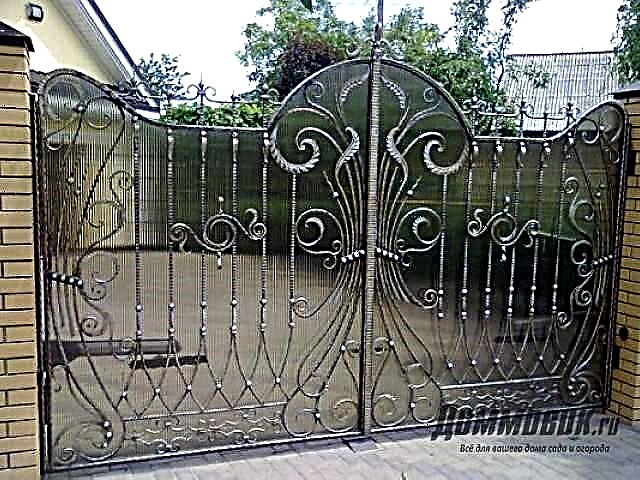
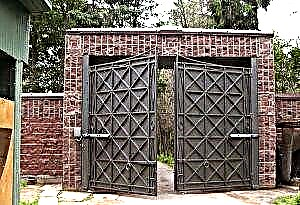
- Swing. The standard and most common view, which is suitable for a fence and a garage. It assumes a large space, which is worth considering before installation. But despite this, this species leads among other species. The frame and supporting structures of swing gates are made of rolled metal. Sashes can be represented by a crate, a color profile, sandwich panels or forged patterns.
- Retractable. The most convenient type of gate to the courtyard to use. They occupy a minimal amount of internal space, however, in comparison with oar - they are inferior in popularity and have a high cost. Depending on the design, they are divided into suspension, cantilever, retractable on piles, automatic and mechanical.
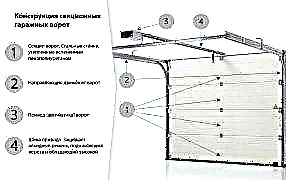
- Garage. Such gates are intended for garages, warehouses and other premises. Depending on the design features and type of work, they are divided into sectional, overhead-and-turn and roll-up gates.
Swing gates
The design is represented by two vertical supports and hinges on which the sashes will be mounted.
Swing in combination with a wicket - a classic option. The design is represented by two vertical supports and hinges on which the sashes will be mounted. Such a design can open in or out. The flaps consist of a metal frame welded from a profile or pipe, as well as from a crate. The latter can be made of wood, metal, corrugated board and other materials. To close the swing gates, a deadbolt can be used to prevent the sash from sagging.
In the manufacture of swing gates, it is impractical to use heavy materials so as not to load the connecting hinges and supports.
By type of opening, this type may have an automatic or manual mechanism. In the first case, about two to three special drives are used to open the shutters inside the courtyard.
Sliding gates
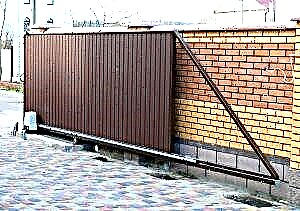
The movement of the canvas occurs on special roller bearings, which are installed parallel to the fence.
The design of the rolling type is represented by guides, the blade and the roller system. The movement of the canvas occurs on special roller bearings, which are installed parallel to the fence.
Before making the installation of such a gate, the construction of the foundation is implied. It is necessary for the correct operation of the support rollers. If this is not done, any surface irregularities can lead to impaired movement of the entire canvas.
The retractable lathing can be made of sheet metal, wood, forged elements, profiled flooring and other materials.
Garage Doors
Depending on the type of gate, the design can be represented by a canvas and a mechanism that sets it in motion. Sandwich panels, corrugated board, sheet metal, steel are suitable as the canvas.
When choosing a structure, it must be remembered that it should also harmoniously fit into the overall architectural style of the house and the adjacent territory.
What tools are needed
Before you install the gates and the gate yourself, you need to prepare all the materials and tools. Most of the tools can be found in your own garage or ask your neighbors, but some will have to be bought.
- Welding machine,
- Bulgarian,
- Screwdriver
- Hammer drill
- Drill,
- Shovel,
- Building level,
- Screwdrivers with indicator and nozzles,
- Hammer,
- Metal brush,
- Keys set,
- Set of drills,
- Drills for concrete of different diameters,
- Roulette,
- Stairs,
- Soldering iron
- Chisels
- Files
- Pliers.
Installation of swing gates
Despite the fact that this type is not entirely convenient, it is the most popular. When creating it, complex mechanisms and electrical components are not used. The swing gates have a two-part frame. They are made of a metal profile welded together. For the rigidity of the frame, special braces are used, also made of profile. The process of their connection is carried out diagonally, after which the weld points are cleaned with a grinder. The final step is the welding of fasteners - a loop for mounting on supporting elements.
The fastening of the flaps is carried out on supporting posts, which can be represented by rigid metal pipes or laid out of brick or stone. For their strength, concreting is recommended.

Swing gates are quite easy to install on their own.
It is important to know not only how to correctly install the enclosing structure, but also take measures to protect it from the negative effects of the external environment. Otherwise, after a few seasons, rust will corrode the metal. To do this, all metal surfaces are covered with 2-3 layers of paint.
After the paint is completely dry, you can proceed to install the casing. The process should be carried out strictly in one direction, namely from left to right. If corrugated board is used, self-tapping screws with a rubberized hat are selected for its fastening. With its help, it is possible to achieve a tight seal and to minimize the risk of rust in the drilling area.
The installation of poles together with the installed gates is carried out as the last step in the prepared holes. For convenience, a wooden beam or brick is placed under the sashes to provide a clearance of about 10 cm. The sashes are supported by braces that will ensure their exact position. The base of the pillars must be concreted. It will be possible to use the gates after 3-4 days, after the poured concrete mortar has completely hardened and will add rigidity to the whole structure.
If the installation is planned on terrain with a slope, then after determining its highest point, one of the wings is fastened. And only after that you can install the rest, including the gate.
Installation with a gate
Installation of gates with a wicket door follows the same principle as without it. The difference is the installation of an additional profile. An additional frame is attached to the side of the structure where it is planned to position the gate. It is on it that the door will be located. Hinges for fastening are welded on its left side, and a valve is installed on the right side.
The width of the gate should be calculated so that a person of any body constitution can pass through it. The standard dimensions of this element are a width of 90-100 cm and a height of 200-250 cm, but if necessary they can be changed in any direction.
Installation of a retractable structure
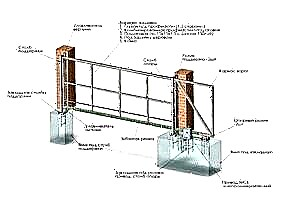
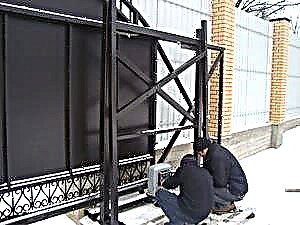
Before installing sliding gates, it is necessary to mount the frame and the supporting structure. The frame for the sliding version of the gate can be installed according to the similar principle of the swing structure. The difference is that the sash will be one continuous. A guide is welded to the bottom of the profile along the entire length, along which the rollers will move. The latter, in turn, are mounted on a metal beam, previously recessed into concrete, during the creation of the foundation for the entire structure. After mounting the sashes, they begin welding. Namely, elements for fixing the opening and closing of the gate are fixed to the support posts.
The gate can be opened both independently and automatically with the help of a built-in electric motor.
Installation of lifting gates
This type is used for garages and other rooms, since it allows to save a lot of space.
Usually this type is used for garages and other rooms, since it allows to save a lot of space. The hoisting mechanism can be actuated both independently and with the help of a special electrical component, which must be placed above the gate. Thus, it sets them in motion by pulling the cables. It is not possible to install them for a summer house or a private house.
What usually causes difficulties
Before installing the gate, you should study the possible difficulties of this process. Most often, the following difficulties and errors arise.
- Incorrect calculation of the depth of the foundation of stone or concrete pillars. Depth is determined depending on the freezing of soil in a particular region. So, for Moscow and the region it will be necessary to dig a hole of 1.7 m, 0.2 m of which will be spent on organizing a sand cushion. If the depth is incorrectly calculated, the foundation may protrude and the gate will malfunction.
- Neglect of geometry when assembling the fence. At this stage, it is important to observe the rule: the diagonals of all wings should not differ from each other by more than 5 mm. Otherwise, opening / closing the gate will be accompanied by a tap.
- Errors in mounting the spring. They are allowed if during their installation it is not ensured that the axes are at the same level. Otherwise, during operation of the door, both the springs themselves and the bearings will wear out. A simple rule will protect components and the door mechanism from rapid wear.
- Difficulties in embedding the gate. Particular attention is required when attaching the gate to the overall door structure. Mistakes made in violation of installation technology can lead to unpleasant consequences. The wicket profile may be replaced and the result is a gap at the profile itself.
- Errors in the installation of loops. Such a seemingly insignificant error can lead to the fact that improperly installed loops will cause the entire structure to bend.
- Untimely film removal. If the film that protects the new surface of the sectional door cannot be removed immediately, it may sinter with the metal surface.
Do-it-yourself power gates for anyone who studies the installation technology, all the possible nuances of the process and come to business with full responsibility. Having free time, desire and all the necessary tools, you can personally place a reliable design and save on workers' services.
Preparatory stage for installation

Assembly and installation of gates is carried out in strict sequence. Having resorted to the help of installation companies with whom it is necessary to conclude a contract. So you can not doubt the quality of the work done.
If the installation of sliding gates will be carried out independently, then, first of all, it is necessary:
- prepare the foundation for future sliding gates,
- then the supporting roller bearings are fixed to the foundation.
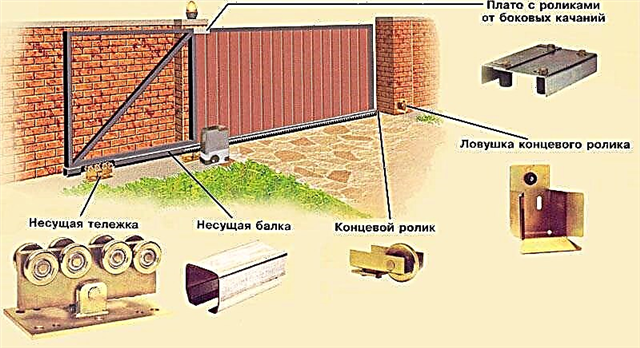
The U-shaped beam, which is the carrier, is welded or screwed to the bottom of the metal frame of the gate. Roller bearings are necessary not only to keep the load from the structure, but also to ensure its free space.

Fastening takes place using a special plate or embedded bolts that are firmly attached to the foundation.
Accessories for sliding gates are produced by many companies, but the most famous in the Russian market are ROLTEK, CAME, as well as the Rolling-Center. All sets differ in the weight of the future design and the width of the opening. When compiling the contract, it is necessary to ensure that the type of component parts that are used for installation is necessarily indicated.
Type of accessories sets
Choosing the necessary kit, it is recommended to build on the width of the opening, which overlaps, the height of the entire canvas, as well as the total weight of the structure.
The first stage is fundamental
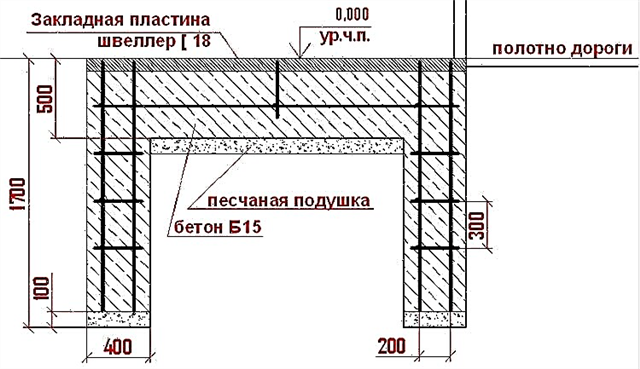
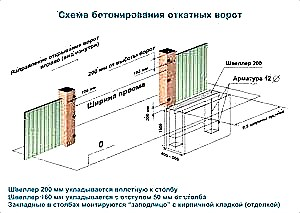
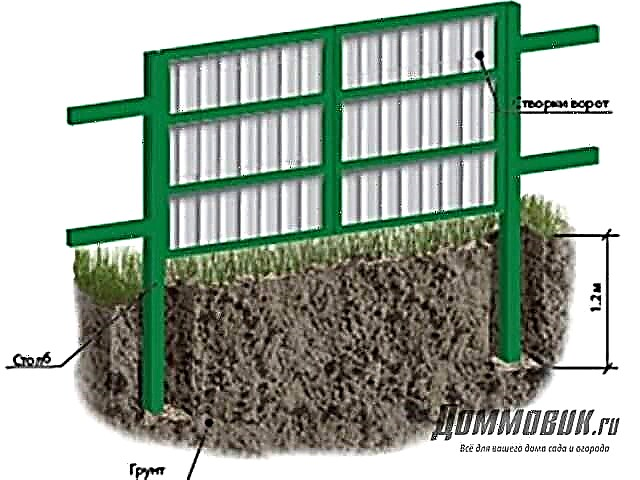
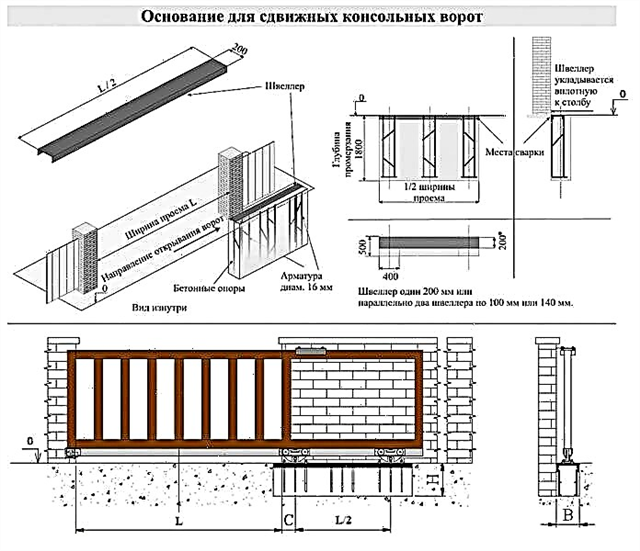
Before installing the foundation for the sliding gate, mark the trench. It is very important that the length of the concrete base, which is equal to 1/2 of the width of the passage, be postponed from the edge of the opening from the side of the rollback. The width of the base for the foundation is 40-50 cm. When calculating the depth of the pit, you need to take into account the level of soil freezing on the ground.
Next, a mortgage element is made. For this, channel 18 and reinforcement (d 12) must be connected by welding according to the scheme. For the production of these parts, low-alloy steel is used, which can withstand the effects of low temperatures, and also resists corrosion well. The length of the channel should be equal to half the width of the opening. When calculating the length of reinforcing bars, it must be taken into account that they must be deeper than the level of freezing of the soil.
When connecting vertical rods with steel jumpers, a strong reinforcing cage is formed. It must be lowered into the trench for the foundation, which was prepared at the beginning of the process.At the bottom of the trench, sand must be poured in advance and compacted carefully.
Before pouring the foundation, it is worth checking the horizontalness of the reinforcing cage. For this, the construction level is used. When leveling, you also need to monitor the channel. Its longitudinal axis should be parallel to the fence line. If a drive will be installed to automate the control of the gate, then when pouring the foundation, you need to lay the wires that are hidden in special corrugated tubes. The output of the wire bundle must be selected depending on the planned location of the electric drive. Typically, such equipment is installed in the center of the foundation.
To fill the foundation, you need to mix a concrete mortar of 5 bags of cement M400, 0.5 cubic meters of sand and 0.3 cubic meters of crushed stone. The poured foundation must be left for several days so that the concrete can gain the necessary strength. After 3-5 days, the installation of sliding gates begins.
Installation work
First of all, you need to identify the line of movement of the gate. To do this, use a cord that is stretched along the opening and is located at the level of 200 millimeters from the base of the roadway and at a distance of 30 millimeters from the post. This cord will help align the position of the main profile or beam.
Now you need to prepare the roller trolleys and install them one after another inside the supporting profile. After that you need to move the carts to the center of the gate. Further, the gate leaf together with the roller bearings is installed on the steel channel of the structure. Further, the first two supports are placed in marked places, and the gates are matched so that they are opposite the stretched cord.
- Attaching roller trolleys to the channel.
To the channel you need to weld the regulating platform of the second roller support. Then the gates are completely rolled out into the opening and the horizontal position of the blade is checked. Next, by welding, it is necessary to weld the control pad of the first roller support. After that, the base of the sliding gate and the support are removed for attaching by welding the control pad to the steel element. Now the roller bearings can be fixed on the platform and slide the sheet of sliding gates. Following this, the gate is installed in the closed position, and the horizontal profile is adjusted.
- Installation of plugs and end roller.

Now you can proceed to install the extreme roller and plugs. For this, an end roller is placed in the supporting U-shaped profile and fixed with fixing bolts. Complete with sliding gates are supplied plugs that need to be welded from the back of the canvas. Due to this detail, the supporting profile is not clogged with snow, which eliminates the possibility of jamming of the gate.
We proceed to install the mortise guide bracket. To do this, it is important to loosen the fasteners of the rollers, and place the bracket above the base so that the rollers touch its upper edge, and the side with the holes goes to the support column. Using fasteners, the bracket is fixed to the support.
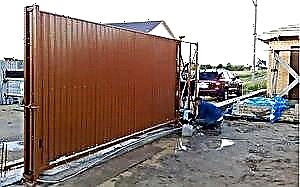
- Covering the canvas with corrugated board.
One of the final stages is the sheathing of the metal frame of the gate with corrugated board. The process is very similar with metal door trim. To do this, the material is cut to the specified dimensions and fastened to the gate using screws or rivets.
- The need for catchers.
Due to the lower trap, part of the load is removed from the roller supports when the door is closed, and the upper trap keeps the door leaf from swaying. The lower element is installed only on fully loaded gates, and the upper - at the level of protected corners.
- Automation and contractual obligations
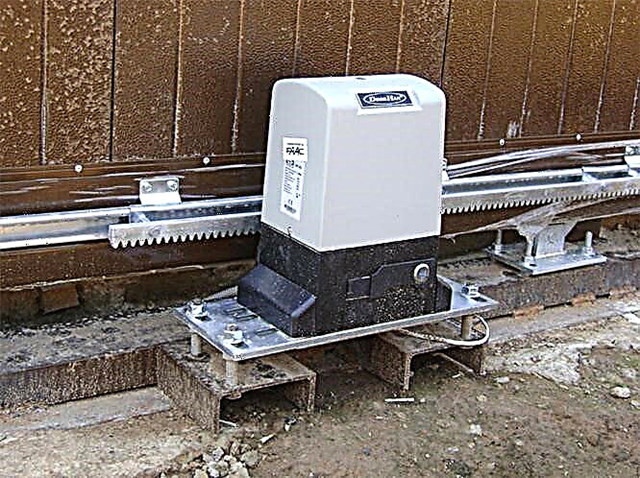
To install automation, it is better to call a competent electrician or use the services of installation companies, which must make an official document with you. It is similar to door installation documents. A sample model arrangement can be found and viewed on the Internet. If this is not possible, then in order not to become a victim of fraudsters, you need to know that the document must necessarily contain:
- Customer and contractor data,
- Subject of the contract
- The schedule of employment and calculations,
- Rights and obligations of the parties,
- Clarification on the use of the product,
- Warranty
- Terms of work
- Types of work that must be agreed with the customer,
- Other conditions,
- Details and signatures.
Installation and installation instructions for gates
The instruction says that the length of the concrete part of the column should be more than 1/3 of its height for light sashes, for heavy gates the underground part can reach half the total size of the gate posts. Additionally, the stability of pillars with heavy flaps is regulated by the size of the holes.
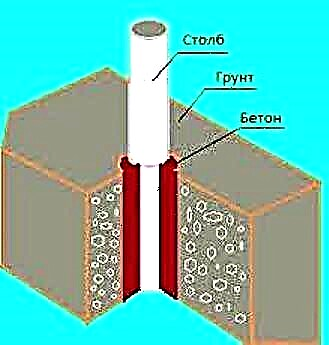
Post installation with concreting of the base
Installation sequence for swing gates
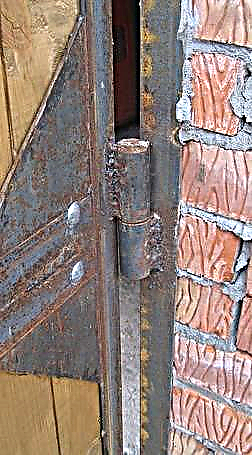
The installation of swing-open gates begins with concreting the support columns, and then the wings are hung on them. For the convenience of work, awnings or door hinges are attached or welded to the uprights and sashes, placing them lying on the ground, then the sashes are removed and the posts are installed.
When installing heavy gates on brick or stone supports, do not rigidly connect the embedded pipe and the masonry. This will avoid dynamic and vibrational stresses acting on the movement of the valves, as well as arising from exposure to wind or humans. The loads from the racks will fall on the masonry, which will gradually collapse from this.
Elements for self-installation of gates
After installing the supports for hanging the door leaves, proceed to the manufacture of door frame frames. In order for the door panels to move smoothly, without jerking, creaking and at the same distance above the ground, it is necessary to make the door frame rigid enough so that all corners of the leaf frames are straight and in the same plane in any weather.
Supporting door posts made of any material should be covered with covers or caps on top, so that natural precipitation does not fall into the interior of the posts.
Forged double-sided polycarbonate-clad gate
The door panels are trimmed with wood, corrugated board or polycarbonate. There are gates made of iron: galvanized sheets, sheets with various perforations and metal mesh with cells of different sizes and strength. In addition, the forged gates forged by the blacksmiths remain unsurpassed in the beauty of strength and durability.
For the manufacture of swing-open gates, you will need a number of tools yourself:
- Grinder with disks for cutting and grinding metal.
- Equipment for painting gates (compressor, spray gun). You can paint it with a regular brush, of course, the quality will certainly not be the same, but it must be painted, this will save the metal from corrosion.
- A welding machine of any design with a sufficient supply of electrodes for welding.
- Drill for fixing the skin material.
- Tape measure, goniometer, hammer, sandpaper, riveter and rivets.
This set of tools should be enough to create swing open gates.
The following materials will be required for the manufacture of sashes:
- The main material will be a profile pipe.
- Everyone chooses the paint for himself, often use the paint that you have available.
- Hinges for gates are selected with the calculation for their gates.
- The casing is chosen to taste, suitable for the material of the installed fence. This can be corrugated board, rolled metal sheet, wood, polycarbonate.
- Accessories are purchased that are suitable for the color and structure of the material selected for cladding, and locking devices such as latches, stoppers and locks.
A set of materials may include a set of automation, in case your plans include automation of your future swing gates.
Door leaf assembly
Work begins with a clarification of the height and width of the passage. According to the specified dimensions, they make a drawing of their future gates. We suggest discussing the creation of the scheme below.
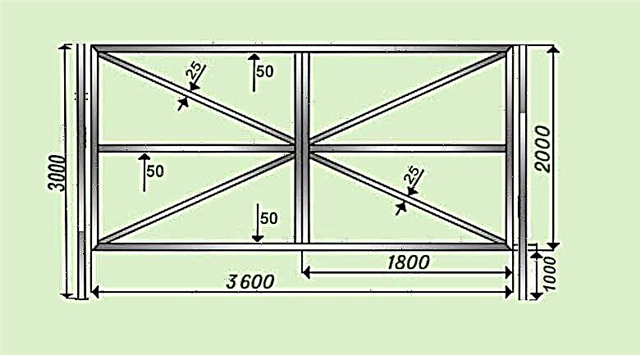
Schematic diagram of the double-leaf gate
According to his measurements, cut 3 pipes equal to the width of the gate, and four segments equal in height to the gate, in addition, four segments, welded diagonally, which are stiffeners, will be required. Then, weld points should be prepared, i.e. clean from oil and rust. Corrosion is disposed of with a grinder with an grinding wheel or sandpaper, and oil is removed with gasoline or a solvent.
When welding the frame, it is required to observe right angles in the rectangle of the sash frames. We suggest that you first weld a rectangle equal to the opening of the gate. A cross member is welded in the middle for rigidity. After that, in the middle, leaving a gap of 1-1.5 cm, they grasp the vertical sides of the wings. Then the frame is cut into two identical leaves. After that, the welding of the frames according to the scheme with durable seams is completed. In the middle, on one of the wings, a strip of metal is welded to stop the wings when closing. In addition, at this stage, the locking elements required for their installation are welded.
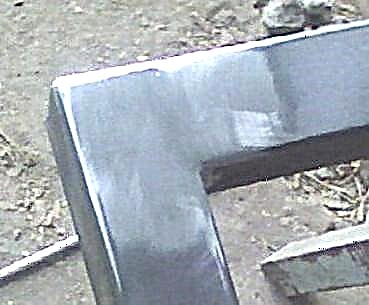
Machined door angle
After completing the welding work, they process the welds, bringing the surface to absolute smoothness with the help of a grinding disc, eliminating slag and bulges in the weld areas.
Protecting the door from environmental influences
The frame must be cleaned and degreased, dust should be removed from it, only after that they start painting. It will be better to apply the paint with a compressor or a spray gun, especially in hard-to-reach places. The frame is covered with a primer and two coats of paint, with each coat having to dry in turn, then the quality of painting will be high.
The casing is produced in two versions, the frames of the wings can be dressed on hinges, and can be in a position convenient for the performer. After sheathing and hanging the door panels, bolts, stoppers are fixed in place and locks are installed. Correctly installed sashes move easily, smoothly, and without creaking. Subsequently, such swing gates will be easy to automate.
Frequently Asked Questions and Answers
To date, cadastral work and their result is a document that is an electronic form, an approved form (Xml-scheme). Any result of cadastral work can be signed with the electronic digital signature (EDS) of the applicant, which will allow the copyright holder not to spend time visiting the MFC to transfer a package of documents for cadastral registration or registering the right to a property, but send an electronic document via the Internet to Rosreestr. To make an electronic digital signature, you must contact any certification center involved in the manufacture of qualified certificates of electronic signature verification keys (KSKP EP), in accordance with Federal Law dated 06.04.2011 No. 63-FZ "On Electronic Signatures" for Rosreestr. In the manufacture of KSKP EF for individuals and legal entities, a special information encryption algorithm is used that excludes the modification of a document signed with such an electronic signature.
The procedure for coordinating the boundaries of a land plot is established by 221-ФЗ dated 07.24.2007. and is mandatory if cadastral work is carried out, as a result of which the location of the boundaries (s) of the land plot in relation to which the work was carried out, or of land plots adjacent to it, information about which is entered in the Unified State Register of Real Estate, is specified:
1) property
2) lifetime inheritable possession,
3) permanent (unlimited) use,
4) leases (if such adjacent land plots are in state or municipal ownership and the corresponding lease agreement is concluded for a period of more than five
The procedure for coordinating borders includes: 1) Notification of all interested parties, 2) conducting coordination of borders and drawing up an act of coordination.
Notification of owners of adjacent land plots can be carried out both individually and by holding a meeting on the coordination of the location of borders and by publishing in the media in the manner established for the official publication of municipal legal acts. The publication of the notification on the coordination of borders is carried out in the absence of information in the USRN about the contact addresses of interested persons.
You can read in more detail in this article the link.
From 01/01/2017 there was a unification of the procedures for cadastral registration and registration of rights of real estate objects in accordance with the effective Federal Law-218 of 07/13/2015. "On state registration of real estate." It will now be possible to issue a real estate object at one stage of the transfer of a package of documents by the copyright holder to the authorized federal bodies to carry out a set of procedures and obtain as a result of extract from the USRN the registered right. To date, this procedure, unfortunately, has not been technically implemented by Rosreestr, but according to information provided by the Ministry of Economic Development, the possibility of simultaneous cadastral registration and registration of rights is planned for July 1, 2017.
In the case of the formation of a land plot from lands owned by state or municipal property, in accordance with the Land Code, a land plot is provided on the basis of the layout of the land plot on the cadastral plan of the territory. The location scheme on the CBT has an approved form in accordance with the orders of the Ministry of Economic Development and can be prepared both in electronic form and in paper form. The electronic form is the format of the Xml-scheme and is signed by the electronic signature of the authorized local government. Provision of a land plot on the basis of the location scheme on the CBT is carried out for plots provided for gardening, personal subsidiary plots, individual housing construction.
After paperwork (preparation of a technical plan or land surveying), a package of documents is sent to Rosreestr through the MFC. The registrar checks the availability of documents, their compliance with the established forms, the correctness of the specified information. If he finds obstacles to registration, he makes a decision on suspension, which he informs the applicant about. To clarify the reasons for the suspension, and to decipher the bureaucratic phrases that suspension usually dashes with, you should contact the cadastral engineer who created the documents. Three months are usually available for changes. You can read more about suspensions and the reasons for their receipt here.
The inability to read a disk, certified by the electronic signature of the cadastral engineer, on the device of the MFC or the registrar of the Rosreestr is one of the reasons for the suspension of cadastral registration. However, the problem is often not a disk or reader defect, but other nuances, which are reflected in more detail here. To solve this problem, you should again contact the cadastral engineer who was preparing the package of documents, and he will rewrite the disc for you.